
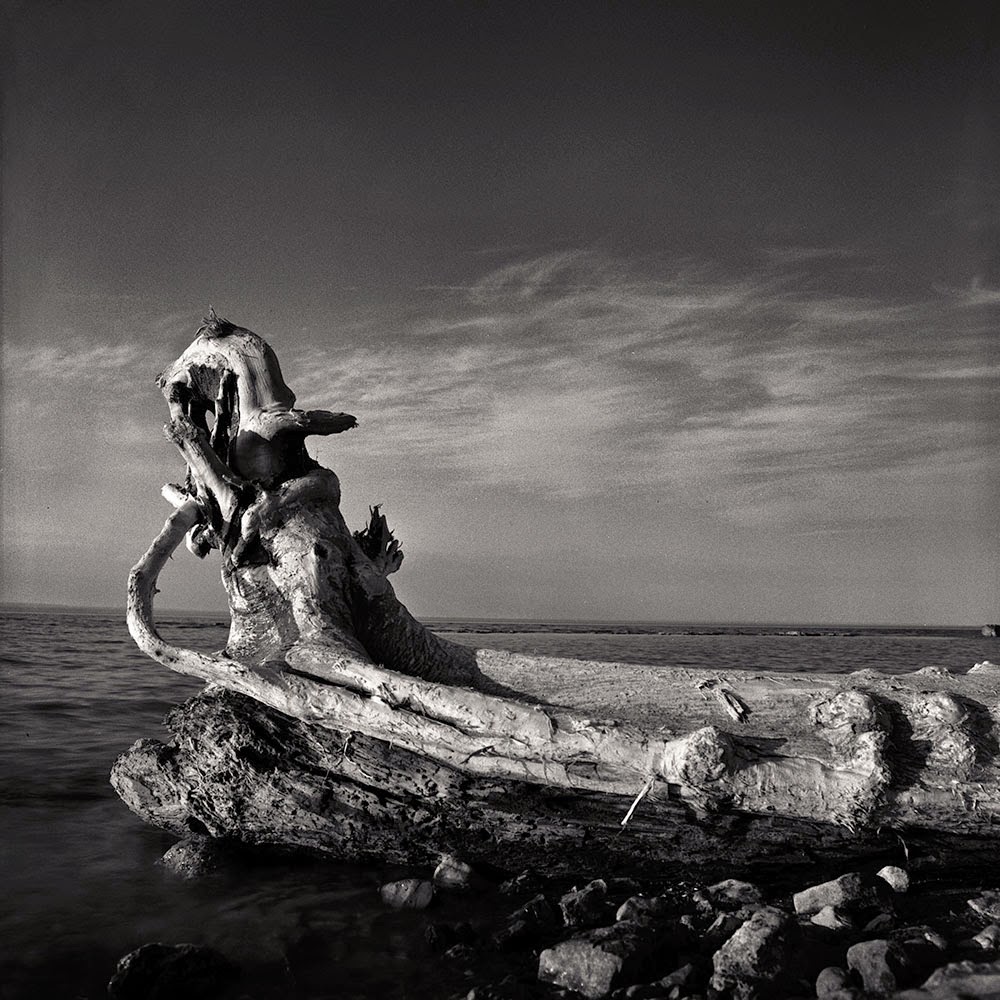
I call this image "Driftwood Dragon", not because it reminds me of the actual creature so much as the dragon figurehead on some ancient ship of war. It's the remains of a tree that, who knows, may have been uprooted and set adrift in Lake Superior, ultimately coming to rest along my favourite little stretch of beach, just shy of the Niagara. It's one of many driftwood logs I have encountered along the shore now that the ice that had carried them is finally gone, a few of which, like this one, I found interesting enough to spend a frame or two on. This one, however, got more than its fair share. It's not that I found it all that particularly worthy of photographic attention so much as the sense I wound up getting that my every attempt to photograph it was accompanied by a particular darkroom mini-disaster. It was almost like a curse.
This isn't just a tale of my efforts to take a picture of a log however, so let me back up a little to put the story in its wider context. While most of the home darkroom practicing world chooses to develop roll film in plastic daylight tanks, most notably those made by Paterson, my preference has always been for stainless steel tanks. The relative merits of each are a discussion for another day. Suffice it to say that that's what I was comfortable with. When I got my enlarger last summer however part of the lot that it came with included no less than three of the plastic Paterson tanks along with a host of reels. For the most part these had been sitting on a shelf ever since, though I did find uses for them now and then.
One such occasion came up a few weeks ago. I returned from an outing to put the Bronica I had just picked up through its initial paces with two rolls of HP5+ to develop. This has never been a standard film for me but I wanted bring something a bit faster into my arsenal to make it a bit easier to go tripod free when the situation calls for it. This also seemed like an opportune time to finally try Kodak Xtol, a developer I had been considering for some time and it seemed like a good match for the HP5+. I actually wound up getting eco-pro, an Xtol "clone" that is rumoured to come off the same production line.
I could have used the larger Paterson tank to develop both rolls at once, but as these were test rolls and I was using a new developer I wanted to at least have a peek at few frames on one roll to be sure everything was okay before going ahead with the second. I processed one of the rolls in the stainless tank as usual and a quick look coming out of the fix showed everything looked fine, but not wanting to wait for that roll to be hung to dry before starting on the second I decided to process the next one in the small plastic tank. Once everything was finished and I had a chance to look at the scans however I got a bit of a surprise. While the negatives from the stainless tank showed a pronounced decrease in density towards the centre of the image compared to the edges, those processed in the Paterson tank seemed perfectly even. The problem itself may be fodder for a future episode, but suffice it to say that since then I have switched to using plastic reels and tanks.
Now jump forward a few of weeks to find me spotting our lump of driftwood on the shore early one evening. There's some fairly interesting clouds in the background though the light is a bit flat. Finding I can't get low enough with the tripod I set the camera down on a convenient flat rock, propping it up with a few twigs to get the horizon level, and make a couple exposures, the second and third frames on a roll of Fuji Acros. Finishing the roll before heading home I developed it that evening only to find that both frames were riddled with pinholes, little spots on the negative where the film is clear. This is much more of a concern than dust spots since not only are they permanent, but they come out on prints as black spots that, unlike white dust spots, are nearly impossible to retouch.

Above is a scan showing the worst of the two negatives with the majority of the pinholes circled in red. There are actually more than I have indicated here that are either small enough not to noticed or are relatively hidden in the darker areas of the image. The scan would be a five minute retouch job in Photoshop, but I wouldn't waste the time paper and chemistry to print this in the darkroom. I've had the occasional pinhole in my images before, but nothing like this. I'd done something different this time though. After reading through some forum discussion on the practice of pre-soaking film before starting with the developer, my standard practice for years, I decided to skip this to see if it made a difference. Well, obviously it had I thought, lesson learned.
Two days later I was up at dawn with a few hours to kill before I had to head for work so I tossed the camera bag and tripod in the trunk and headed out for some morning photography, including a re-shoot of my dragon boat log. The light was much better now, so maybe it was a blessing I had problems with the first shots. Even the little twigs I had used to level the camera were still there as I had left them the other day. I set up just as I had the day before and did a couple of exposures, then just for insurance switched film magazines and playing around a bit with exposure and filtration did three exposures on HP5+ before finally switching back to the Acros to make two more exposures from a slightly different angle.
I finished the roll of HP5+ a couple days later on some shots of my daughter and processed it right away. This time there would be no skipping the pre-soak. The result was nine negatives completely free of pinholes or any other nasty defect, but though they weren't as bad three images were still marred by them. Guess which three.
I should take a moment here to discuss some of the causes of pinholes that appear like this on negatives. By far the most common is air bells, little bubbles that cling to the surface of the film, preventing chemistry from reaching the film. The best remedy for this is to rap the tank sharply a few times after the developer is poured in and preferably after each agitation cycle. I'm a bit of a fanatic about this, having once broken a tank in my efforts to ensure any air bells had been thoroughly shaken off, so I don't imagine this sudden issue is the result of any lack of bubble-jarring diligence on my part. A pre-soak also tends to diminish the tendency for air bells to form which may be why the problem was so much worse when I didn't do this. Pinholes can also form as the result of chemical action when the film is taken out of the alkali developer and suddenly introduced to an acid stop bath, but I don't use an acid stop bath for film, preferring a water rinse instead. Finally they can appear as a result of dust or debris lying on the film surface at the time of exposure. There may be other known causes, but I'm not aware of them.
 |
| Pinholes in a portion of one of the HP5+ negatives. You probably don't need me to circle them. |
First up was the developer. When I finished up the roll of Acros with the remaining log photos, rather than using the eco-pro I mixed up a batch of Beutler's, a tried and true formula for me and a favourite for me with fine grained films like Acros. It also occurred to me that all of the problem images were among the first few images on the roll. These would have been on the innermost part of the processing reel, so as a precaution I wound the film onto the reel starting from the other end. The result? Pinholes in three of the four images of the dragon log. The image at the top of this post is the only one out of nine taken of this subject on which no pinholes were evident.
For my next roll it will be back to the stainless steel tank. I do get the impression that the more tightly wound plastic reels of the Paterson tanks tend to trap more tiny air bubbles than the stainless reels. Paterson tanks are by far the most popular type of developing tank out there however, it's hard to imagine they have an inherent flaw like this that nobody's talking about.
There is just one other possibility that comes to mind when I consider this - these problems have appeared on the last three rolls of film, each roll having twelve images for a total of thirty-six frames. Of those thirty six, nine were of this driftwood dragon, eight of which were marred by pinholes. I have had a decent look at the remaining twenty-seven and twenty-six of them don't seem to have any problem at all. Maybe I just need to stay away from this log.
No comments:
Post a Comment