Showing posts with label Mamiya. Show all posts

Saturday, 17 December 2016

Back Into the Vortex


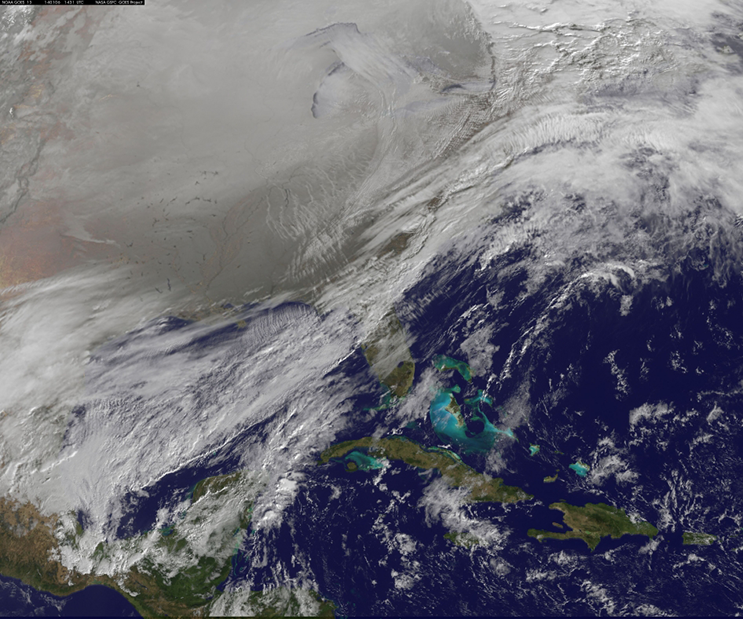
Two years ago I posted "Budget Time Travel : A Photographers Guide" explaining the notion that, at least in sorts of latitudes where I live, winter photography can transform familiar, well worn scenes into something other, providing the photographer willing to brave the cold with an alternative to long distance travel in order to find fresh subject matter. That was written during the winter or 2014-15, the second year in a row in which a weak polar vortex failed to keep arctic temperatures confined to the arctic, allowing them to run amok over the eastern half of North America including the Great Lakes region. Last year though the term 'polar vortex' which was becoming oh so familiar was replaced with 'El Niño', and with it came more mud than snow. While this was a relief in just about every other way, it didn't make for much photographically.

NOAA/NASA GOES Project Image
So here it is, mid-December 2016 and for the third time in four years we're hearing about the polar vortex again. Really I've been hearing the term bandied about since the summer, usually in discussions that started with the old "they say it's going to be a nasty winter" without any mention or probably even conception about exactly who or what "they" are. It wasn't really until just this week when a normal, possibly even warmer than normal autumn suddenly gave way to mid-winter conditions that I took much notice. Not that I or anyone else who lives in this part of the planet had much choice if they had any plans involving stepping outdoors.

As this cold weather snap coincides with that time of year where days are so short I drive both to and from work in the dark it wasn't until yesterday I had some free time during daylight to take advantage photographically. Given this is also the time of year for holiday preparations it was not a whole lot of time though, so with time constraints I decided to stay in town and make the most of my favourite local well trodden subjects, a decision it seems that turns out to have been the right one.

Take the lead image for example. Some readers may recognize the subject as that same crumbling break wall that was featured in my post almost exactly a year ago in "One Subject, Many Approaches II". It also appears in the post just previous to this. Other than being some structure jutting out into the water, with its thick coating of ice it seems almost unrecognizable here. I had actually headed out the door on bright sunny morning to do some shopping but noticing the heavy band of clouds hanging over the lake turned around and collected my Mamiya gear. It was only in the last few hundred metres of my drive out to the lake that the sun became obscured by cloud cover. That came as a bit of a disappointment as I'd been hoping to capture a dramatically sunlight foreground to make the dark clouds over the lake seem even more dark and ominous but looking at it now that might have been too much contrast. The clouds are plenty dark on their own. It only got cloudier the longer I stayed and before long I was having to take measures to keep the falling snow from collecting on my equipment.

I made the mistake of leaving without a good cable release. I had the $5 cheapie that sits at the bottom of the pack as a spare but after an hour or so in the cold that came apart and with the diminishing light as the once distant clouds moved overhead started bringing exposure times uncomfortably low to manually release even with the tripod I decided that shopping I had shouldn't be put off too long. I did manage to slip out again later that afternoon just to finish the last half of the roll that was in the camera.

I guess it's possible that this cold snap may be just the prelude to an otherwise normal winter. If so I was glad I got this chance and there will no doubt be a few more notable days before the season gives way to spring. On the other hand given how things so far are right in line with what the meteorological pundits have been saying, and experience with other recent winters, this may be just the tip of the iceberg.

Finally, for your enjoyment, here's some more from my first photographic foray of the new winter:


Saturday, 28 May 2016

Shooting below the belt.


For most people it seems photography is something that takes place at eye level. It's almost an ideal - the camera as an extension of the eye. So it is that the vast majority of cameras made over the last several decades have been designed to use by being held up to the eye. In this way photographers can expect to photograph the world the way they naturally experience. The thing is, sometimes the whole point of photography is to see the world in new ways, to find in the world of familiar experience aspects of the unfamiliar. While cameras designed to mirror the way we look at the world everyday may be the norm, it doesn't have to be that way, which is probably why I, like so many other photographers, have become a fan of the waist level finder.

These days cameras with a waist level finder, or WLF, are an uncommon enough phenomenon that I should probably take a moment and make sure everyone is clear on what I'm talking about. In the most general terms if a photographer has to look down at the top of the camera to frame up the image this is called waist level viewing. camera is designed such that the photographer frames up the scene by looking down at the camera to view the image this would be a waist level finder. In the years after George Eastman brought photography to the masses waist level viewing was common in the cameras of the day by virtue of mirrored viewfinders such as you will find in nearly any old box camera. These offered a handy reference for roughly what would appear in the image but the straight-through viewing of a view camera or a rangefinder were employed when some aid to focusing was required. The waist level viewfinder photographers from the mid 20th Century on came to know are the natural result of the introduction of reflex cameras, twin lens reflex (TLR) and single lens reflex (SLR). In a reflex camera the image from the lens is redirected by a mirror to a focusing screen at the top of the camera. A TLR uses a separate lens matched to the primary taking lens, while an SLR mirror redirects the image from the taking lens for focusing then flips out of the way during the exposure. A waist level finder is simply an aid to viewing the image on the reflex focus screen directly by providing a shade for the screen that normally collapses out of the way when not in use, and which will often incorporate a flip up magnifier to aid with critical focus.


But while waist level finders are a mainstay of TLRs, they are rare in 35mm SLRs and to my knowledge unheard of in DSLRs (which after all, are just SLRs that happen to have digital sensors). Instead, a special five sided prism, a pentaprism, is employed, redirecting the image to the back of the camera, correcting as it does the mirror reversed image that occurs when a reflex focus screen is viewed directly. Since this viewing arrangement using a pentaprism allows the photographer to bring the camera to their eye, effectively looking right through it from the back, these are often referred to as eye-level finders. Whatever you call them they are a built in feature on the vast majority of 35mm SLR cameras, meaning that despite their reflex design this class of camera adopts a straight through, "extension of the eye" viewing style more natural to other camera designs such as rangefinders.

But while waist level finders are a rarity in the 35mm SLR world, this is not so when it comes to my usual weapon of choice, the medium format SLR. Once the mainstay of professional wedding and portrait photographers these cameras typically feature a more modular design that usually includes an interchangeable viewfinder system, While photographers could opt for a more expensive, and therefore often considered premium eye-level finder, this did not automatically make them everyone's first choice. For a variety of reasons waist level finders are a much more practical option with medium format cameras than is the case with 35mm. To begin with the focus screen is physically larger, matching the negative size, which makes direct viewing much more comfortable. A definite weakness of the WLF is that they are rather awkward when the camera is turned sideways for vertical shooting, but many medium format cameras are either designed for square formats where there is no vertical, or feature rotating film magazines that allowed a switch between vertical and horizontal shooting without the need to rotate the entire camera. Thus while some saw the more economical waist level viewers as an entry level option many photographers stuck with them throughout their careers despite having the option to easily upgrade.

Vivian Maier and her Rolleiflex. The kids today could
learn a thing or two about taking selfies.
There are a few reasons commonly sited for this. In discussions of the work of Vivian Maier for example it's frequently conjectured that her work benefited from the fact that  that the waist level finder of her Rolleiflex camera made it less obvious to her subjects that they were being photographed since she was looking down at her camera, diminishing the sense that they were being observed. That's all well and good for a street photographer but given my bent for landscape subjects it's hardly a reason for me to be a WLF fan. In simplest terms for me it comes down to the way this kind of viewfinder simplifies and encourages the use of lower camera angles, everything from chest level all the way down to the very ground itself.


From our usual eye level vantage point of perhaps 1½ to 2 metres our attention is most easily drawn to things at a similar height, most especially other people which is fair enough, but it does make it easy to overlook what's going on closer to the ground. There's a lot of interesting things to be found near the ground, almost (so the joke goes) as if they were drawn there by some mysterious force; rocks, seashells, sun bleached antelope skulls, creepy old dolls, forgotten and discarded, once loved by a little girl now in her mid thirties. And yes, we could photograph all of these things by standing over them an shooting down as they lay at our feet, but I hardly think I need to explain why this approach is so unlikely to lead to anything that is interesting photographically. It's just a patch of ground with something laying on it.

Get down closer to the level of that whatever it is though and everything changes. There is context, meaning, story. That seashell stands alone against the expanse of sand water and sky from whence it came, the unfortunate antelope amongst the scraggly vegetation struggling up from the cracked dry earth,  a victim of its harsh surroundings. That creepy doll that somehow found its way to the base of a knotted old tree in the sinister gloom of a misted wood where.. my god, did I just see it move?

You could of course photograph all of these things using a camera that has some sort of straight through camera. For the lucky there will always be a spot of dry ground to shoot from, and for the intrepid one can simply endure going belly down into the wet, the muck, the unidentified vegetation that to the best of recollection isn't exactly what poison ivy is supposed to look like and that bit of a mound that, if it's home to fire ants, you'll know soon enough. But even granting such acts of machismo might be your thing that eye level finder is hardly drawing your attention groundward, inviting you to explore the world from a new point of view and encouraging you to explore the visual world from this new perspective. For that, there's the waist level finder.

Of course my weapon of choice is the traditional medium format SLR where this style of viewfinder really shines. There are WLF alternatives for some 35mm SLRs. For vintage aficionados they were sometimes standard in early SLRs of the 1940's and 50's, but if you're after something more recent all but the most current members of Nikon's F series have interchangeable viewfinders and while uncommon there are WLFs for these cameras out there. Alternatively however a right angle finder that fits over the eyepiece of the prism viewfinder is available for a greater variety of 35mm cameras giving many of the same benefits while rotating versions eliminates the limitation of horizontal only shooting. These of course can also be the ticket if you shoot with a DSLR, though you can bet that if I were a digital shooter I'd chose a camera with one of those nifty articulated live view screens.

Admittedly there are times when waist level finders are not the ideal thing. They are good up to about chest level but no higher, and sometimes either to get the needed perspective of just to shoot over a fence this is a severe limitation. Once or twice in a pinch I have turned the camera sideways, standing at a right angle to the subject, just to be able to use it at eye level. For my Mamiya and Hasselblad systems however I have prism finders that can be swapped in for the waist level versions. These might actually get used, if I'm being generous, about 5% of the time and if I leave them in place after using them I inevitably replace them with the usual waist level finder in the next shooting situation because the eye level view just isn't working for me.

The 'Blad with waist level finder attached, optional prism finder to the right is ready when needed.

There are times when 35mm would do just fine but I still bring the medium format gear not because the bigger negative is suddenly important to me, but because I know the eye level finders I have on all my Nikons will almost certainly bring me to a choice between belly crawling on some questionable terrain or not getting the shot I want. And while I'm fully kitted out for 4x5 I'll still nearly always go for the medium format gear bag on the way out no so much to avoid the extra heft (though there's that) or the extra expense (thought there's that) but because, again, there's that straight through viewing. There are things on my photographic horizon (to be discussed in future episodes I'm sure) that have me thinking hard about shooting those big negatives more often. There are right angle viewers available for 4x5 cameras... It seems the wish list never quite ends.


Sunday, 29 March 2015

Meet the Beast: Part II

In this second installment of Meet the Beast we're going to have a quick tour of the Mamiya RB67. For serious photographers who like to work with film there's a treasure trove of professional quality medium format equipment on the used market these days at prices that would have seemed like a miracle in the pre-digital age, and of those the Mamiya RB67 represents one of the best values in terms of price and capability.

Early results from not long after I started using the RB67. No coincidence, this was also right about the time my DSLRs became permanently relegated to utility image duty (mostly involving shots of my film cameras.)
The original model, the RB67 Professional was introduced in 1970 and updated versions were released in 1974 with the Pro S model, and finally in 1990 with the Pro SD model which was available new into the early 2000's. There's actually very little difference between them considering 30 plus years the RB was on the market, so if you know how to use one version you won't have any problems with any of the others.

As a medium format camera the RB67 normally uses the same 120 roll film popular in everything these days from Holga to Hasselblad. As the name suggests the RB67 is designed around the 6x7cm format, which means on a roll of 120 film you'll get 10 exposures. The rectangular format means there's almost no cropping required when making prints on standard size papers like 8x10 or 11x14 compared to the square format you get with many similar medium format SLRs such as the Hasselblad, virtually all Twin Lens Reflex cameras, and most of the “toy” cameras that are so popular these days.

The RB67 is a modular system. Six separate components have to come together to create a camera that's ready to use – the camera body, lens, focusing screen, finder, revolving adapter and film back.

The RB67 broken down into its individual components. Clockwise from the top left are the revolving back adapter, camera body, lens, waist level finder and 120 film back. The focus screen is also interchangeable but has been left in place here.


If we start with just the camera body we find there aren't many controls here. From the photographer's position behind the camera we see there's a large lever on the right that might be tempting to think of as a winding lever, but it's functions are limited to raising the reflex mirror and cocking the shutter. The film is wound using a separate lever that's part of the film back. We also have a large wheel on either side which are linked, and these are for focusing. The RB67 is designed to focus by means of bellows built right into the body. There's a release button up front to the lower right which is threaded for a cable release, and that's it for all the controls on the body. The only other detail of note is the accessory shoe, or cold shoe, on the left side.


Lets move on to the lens because this is where most of the controls are. The RB67 uses leaf shutters integral to the lens, so the lens barrel is where you'll find both the shutter and aperture settings. Shutter speeds typically run from 1/400th to 1 second plus a T setting for long exposures. The design of the time exposure mode is one of my little peeves with the RB. When set to T shutter stays opened when it is released which is fine, but instead of the usual method of a second press of the release to end the exposure with the RB you either have to rotate the shutter speed ring off the T setting or start rotating the cocking lever, either of requires you to handle the camera while the shutter is still open, potentially ruining the exposure. Admittedly I can't say I've ever actually lost a shot this way, at least not yet, but why the designers couldn't simply incorporate a superior method that had already been standard leaf shutters for decades is beyond me.

Typical exposure control settings on an RB67 lens. The focus distance scale up front is just a reference for depth of field/hyperfocal distance. Working back from there is the shutter speed ring then the aperture ring. The black switch behind that is the X/M flash sync setting. The red markings near the body are for aligning the breach mount ring when mounting and removing the lens.

Since the shutter is built into the lens this is also where the flash sync terminal is, the standard p.c. socket. As with all leaf shutters flash sync works at all shutter speeds so you can use fill flash outdoors on even the brightest days. I don't know if there's an X/M sync switch on all RB lenses but there is on all the ones I own. Another standard feature on RB lenses, one that's easy to miss, is a little leaver on the lower right that closes the aperture to the stop you have dialed in giving you a quick check on depth of field in the viewfinder.

And finally we come to this little receptacle. At the centre is a standard cable release socket but the collar switch that surrounds it probably needs some explanation. You'll find it can be set to one of two settings that may be labeled “Normal” and “Mirror” or simply “N” and “M”. Setting it to Normal mode, or N, disables the in-lens cable release socket and turns shutter release control over to the release button on the body. Pressing the button or squeezing the cable release attached to it activates the usual exposure sequence, lifting the release mirror, closing the aperture and firing the shutter. In Mirror Up mode, or M, the button on the body just raises the mirror, at which point the shutter can only be fired with a cable release attached to the socket in the lens barrel. This nicely provides photographers with the functional equivalent of a mirror-up lever, but for the unwary there's a hidden trap, and yes I speak from experience here. Being the sort of photographer who normally operates from a tripod and shoots non-moving subjects, normal mode for me is anything but. The lenses are used in mirror mode virtually all the time and I just leave them there. Should I decide to go hand-held or simply don't want the shutter to fire immediately when , there's absolutely nothing to indicate anything is wrong should I forget to turn the switch to normal. I once blew the better part of a roll happily firing away, oblivious to the fact nowhere in that satisfying clunk of the mirror releasing was there a soft click of the shutter. It's the kind of mistake that, in theory, you're only supposed to make once, so lets hope those theorists know their stuff.


The unusual Normal/Mirror Up selector found on the barrel of RB67 lenses. Even experienced photographers will need to acquaint themselves with this peculiar switch before using the RB67 for the first time.

Moving to the other end of the camera, like many medium format SLR's the RB67 uses interchangeable film backs that give photographers two important advantage. First an foremost owning more than one back gives you the ability to switch mid-roll from one film types mid-roll simply by loading each back with a different emulsion. Loading a roll of colour film, therefore, doesn't commit you to finishing the roll before being able to shoot black and white. Second, special purpose backs can be used. The RB67 system included backs for shooting 645 and 6x8cm formats, and two backs that accepted different film formats, 220 and 70mm. While 70mm backs are a rarity, 220 backs were almost as common as the standard 120 version so a word of caution may be in order here. There aren't many 220 films still available, in fact to my knowledge Kodak Portra is the only thing available. If you're in the market for an RB67 it can be easy to overlook the fact that the one you found only comes with a 220 back. On the other hand Portra is a fine film and you can probably find some bargains on 220 backs.

The 120 film back removed. Note that the back has its own winding lever to advance the film, a function the lever on the body does not perform. Backs for 220 and 70mm film are also available as well as 645 and 6x8 format with 120 film.

One final advantage that may be easy to overlook – about half of the things that are likely to fail on a camera like this are in the film transport system. At today's prices just replacing a film back is likely to be much cheaper than having the whole camera repaired, and if you have spares after a failure like this you can just keep shooting.

As with any back that is removable there is a dark slide to keep the film from being exposed when it's not attached to the body. While you could pull this out and leave it as long as the back remains attached it's an easy thing to lose so it's good practice to leave it in until you're ready to make an exposure and return it as soon as you're done. There's no need to worry about accidentally leaving it in or out at the wrong time though as safety mechanisms are there to prevent you from removing the back if the dark slide isn't in, or tripping the shutter when it is in.

So far the RB67 back sounds pretty much like standard fare for a ;medium format SLR of this type, but now we're coming to this camera's defining feature, because the "RB" in RB67 stands for revolving back. Most cameras that shoot rectangular format negatives need to be turned on their side if you want to shoot verticals. That's not much of a problem with 35mm cameras but that presents more of a challenge with heavy medium format SLRs that are more likely to demand the use of a tripod. To shoot verticals most tripod heads require the camera to be dangled off to one side where the camera's extra weight can threaten to tip the whole tripod over. This is one reason so many medium format cameras adopt the square 6x6 format as there is no vertical or horizontal while you're shooting, This keeps the camera's centre of mass over top of the tripod, but making standard rectangular prints requires a good portion of the big gorgeous medium format negatives to be lost to cropping. The RB67 however allows the camera to remain on top of the tripod like a 6x6 camera at all times, making the switch between horizontal and vertical by rotating the back alone. This is done by means of the revolving back adapter, an attachment placed between the body an back. Normally this remains attached to the body as there is rarely a reason to remove it so some users may simply assume this is part of the body. It's and important thing to consider when purchasing an RB67 body alone as sellers might or might not include this component. Remember the back can't be attached to the body without one, even if you're willing to forego the revolving back feature.


At last we come to the finder which, it should be no surprise to learn is interchangeable and many types are available. Most common is the standard waist level finder that is similar just about every other WLF on other medium format cameras. There's no release button required to raise it, you simply pull up on top cover, under which you'll then find a small lever on the right that pops up the focus magnifier. While this is the most basic magnifier it's also the one I prefer, though anyone not accustomed to this type of viewer may find the left/right reversed viewfinder image difficult to adjust to. There is also an eye-level prism finder for those who prefer that fully corrects the view at the cost of some weight, but you're already dealing with 2.5 kg or more worth of camera already, so what's a little more? If you want to go a bit further there are also finders for the RB with metering and other special features. Of note finders are one of the few items made for the RB's sister model the Mamiya RZ67 that can be swapped between the two models. Since its the finder that carries the most visible camera model label it's not unusual to see an RB67 that has "Mamiya RZ67" emblazoned across the front.  

Well, that's all my heart can take this week. In future installments I'll be going into more detail with functional basics such as loading the film, changing lenses and so on, followed by a summary and a few final thoughts. I'm hoping to keep things on a semi-regular weekly schedule but apologies in advance if things are late as I'm expecting to integrate a bit more video as well as all the while I'm bringing a new element into my photographic world which... well, you'll see.


Saturday, 21 March 2015

Meet the Beast: Part I

I confess, I've been holding out on you all. That camera I keep talking about, my photographic tool of choice since before this blog began, the Mamiya RB67, has been lurking in the background of much of what I've written in the past, perhaps somewhat mysteriously for those of you not acquainted with its marvels. It occurred to me some time ago that introductions were in order by way of a few episodes devoted to this camera along with all the agony and ecstasy of using one. It's something I could write about any time though, so I figured I'd keep it in reserve for a day I found myself struggling to find a topic. Instead, finding myself once more struggling with the opposite problem of trying to decide which of several topics to tackle next, it occurred to me that if I was waiting for writer's block to occur I might never get to it. And so it was decided I'll wait no longer.


While I have always referred simply to my Mamiya RB67, for the sake of accuracy I should state I have the RB67 Pro S, the penultimate model in the evolutionary sequence of RB67 versions released as updates were introduced. Actually I have two of them. The first one I purchased in September of 2013, complete with lens, 120 back and waist level finder, for under $200. It had a few scrapes and small dings, along with some sort of purple paint stains in the leatherette covering of the finder, but was absolutely functional. Currently undergoing a bit of cosmetic surgery on my basement worktable, it was demoted to a backup role last July when I got my hands on a prettier body via an opportunity purchase. I was really just looking for a good deal online on a second 120 back when I came upon a back, body and waist level finder at a price that was around the high end of what others were asking for a back alone. How could I not?

Back when I was in my twenties the RB67 easily made my short list of cameras I most dreamed to own. In fact if I actually kept such a list officially it probably would have spent more than its share of time at the top. Hasselblads are probably the more typical dream cameras but at the time (though definitely not now) square format was a bit of a turn off for me. The RB67 was really the one and only camera that hit every spot on my checklist - it's a full-fledged SLR that shot big negatives just this side of large format. takes interchangeable lenses backs and finders, shoots rectangular format so no film gets wasted cropping squares (keeping the images square, who does that?) but doesn't require flopping the camera to the side of the tripod to shoot vertical images. The only thing that kept me from owning one at that time was that they were priced into the stratosphere, affordable only to those who could make money with them and the very rich. The thought of owning one was a pipe-dream, almost on par with the Ferrari I wanted. 

Time moves on and many things change while others do not. Ferraris have gone from being the apex symbols of social status so many lust after but can't hope to ever afford to carbon spewing monstrosities so many lust after but can't hope to ever afford. Meanwhile, in that same time period the Mamiya RB67 has gone from being a well engineered, supremely capable photographic instrument considered the exclusive purview of professionals and the most dedicated of wealthy amateurs, to being  a well engineered, supremely capable photographic instrument a schmoe like me can pick up on eBay almost as an afterthought. The cameras haven't changed, it's just the pros who used them now have to satisfy customers for whom even the minute it takes a Polaroid to develop isn't instant enough. Think of that next time you hear laments about how rough it is being a film photographer in the digital age.


So kit-wise at least, my photographic world is pretty rosy, but while I now own the 231year old me's ideal camera plus a spare, now that I'm twice that age (and nearly half again the mass) my thoughts about what constitutes an ideal camera have changed. As I previously hinted at for example, while I once considered it wasteful to shoot square negatives and later crop to a rectangular print, I now often crop rectangular negatives to square images. Yes the 6x7cm negatives are nice when I don't do this but on the whole I think I'd give that up for the benefits of 6x6cm square negatives including 12 rather than 10 exposures per roll, easier storage and the ability to fit one roll of film onto a single 8"x10" contact sheet. That would be so if everything else were equal, but there's something else to consider - providing that extra centimetre's worth of negative costs quite a bit in terms of sheer mass. As I've noted time and again in the past, the Mamiya RB67 is a big heavy camera, and I don't just mean big in the way a medium format camera will be big if you're used to 35mm, Consider this - I put my Nikon FM with a 50mm f/1.4 lens on the kitchen scale and got about 860 grams.  A Hasselblad 500C/M with 80mm lens, 120 back and waist level finder comes in at 1555 grams (source: www.photoethnography.com), a 695 gram penalty to go from 35mm to medium format. On the same scale my RB67, 127mm lens, 120 back and waist level finder comes in at 2596 grams, more than an extra kilogram compared to the Hasselblad, itself a solidly build medium format camera.

The truth is Mamiya designed the RB67 to be a studio camera, luggability was never high on their desired traits list. One thing that was high on that list however, given the importance of dependably in the high volume professional environment for which they were intended, was ruggedness, meaning they're entirely up to the task of outdoor use where conditions are often less than ideal so long as one is prepared to bear the extra load. And this enduring performance, combined with their once near ubiquitous presence in professional studios, mean there is still an ample supply of RB67s on the used market today. This, combined with the limited market appeal they have due to their bulk, make the RB67 the current champion on  the used medium format SLR market in terms of performance/price ratio if you're willing to bear the load.

Granted that can be a pretty big if and for many that alone is a deal breaker. After a largely successful year and a half of ownership it still gives me pause. Even if you leave size and weight issues aside there are things anyone looking at an RB system should take into account in terms of operational and system considerations as well as a few downright quirks. We'll have to leave those for next time however when I'll go into more detail about what it's like to actually operate one of these beasties. 

Thursday, 12 February 2015

Budget Time Travel: A Photographer's Guide

The surface of Lake Erie, February 2015. Perhaps if one were to visit this exact spot in another two million years or so it would look quite similar, with sand and rock standing in for the snow and ice seen here.

If you've been following this blog for any length of time you'll know I belong to that large group of photographers for whom location and subject are usually one and the same thing. In order to have some measure of variety in our work travel is a virtual requirement, though for myself and others with similar restrictions on time and finances this need not involve a globe trotting lifestyle.

As I was in the midst of shooting the images featured in today's episode, my mind as usual wandering a different landscape than my body, it occurred to me a photographer could bring similar variety to their portfolios if we could travel in time rather than space, zooming into the future and watching the landscape change around them. Seasons would pass before our hypothetical photographer's eyes, bringing a lifetime worth of change in only minutes. They might grab a few shots as whatever apocalypse eventually befalls us all passes by in time lapse quick time then watch as the forces of climate and geology transform the landscape, perhaps turning a sea-side vista into a desert.

White on white subject matter in not particularly contrasty light made for some pretty flat looking negatives. On the light table the last negative taken on a previous day on the left and the shot taken just previously to the above image above on the right, side by side on the same negative strip. Contrast is fairly easy to adjust in a scan but it should be interesting to see what it takes to print this in the darkroom.


I do travel through time of course - forward only at the rate of one minute per minute like everyone else. I might hope for epoch spanning powers, but alas yet another Christmas has come and gone and once again no Tardis under the tree for me. But if the ability to zoom back and forth through time still eludes me there are times and places where nature transforms a landscape so rapidly as to present the illusion of the passage of geological ages in the course of just days or weeks. Though such occasions often follow in the wake of floods, volcanic eruptions or other such disasters, the trigger may be as benign as a change of seasons. And if you're lucky enough to live by one of the Great Lakes, especially Lake Erie (the shallowest and therefore first to freeze) all it takes is the onset of a solid winter.

In a way this is really the third installment in an unplanned series that started with Embracing the Elements and A Follow Up Visit. The images are from my second follow-up visit made in the first week of February. The location once again is my usual lake shore stomping grounds which, somewhat ironically perhaps, was once the site of a popular summer resort. It's where I go when I don't have much time and don't feel inspired enough to look for something new to photograph.  As you can imagine, under normal circumstances it's getting hard to find anything fresh to photograph, but a winter like this transforms it into a whole new location. A few weeks of cold weather is all it takes to transform my sea side vista into a desert landscape so long as you don't mind the fact the ground is covered by snow instead of sand. (Actually, in a whipping wind with temperatures in the -15oC neighbourhood, I did mind just a little.)

A shot from the Nikon F80 equipped with a Tamron SP 20-40mm lens and a yellow filter. I didn't have much choice about the filter as it, along with the red filter I attached the Mamiya's 50mm Sekor lens, wouldn't budge once I screwed it on until I got home and everything warmed back up. 


Equipment wise I brought my usual RB67 kit, this time bringing my Nikon F80 sporting a Tamron 20-40mm zoom as a side arm. Obviously I'm not using the Nikon enough as the roll of Ilford Delta 100 I managed to finish that day bore a few family photos that were obviously taken last summer. By the sound of things its built in auto-wind motor was obviously struggling in the cold, and doubly so on the rewind, but it soldiered on admirably and the resulting negatives were none the worse for it. The cold also affected the film back on the RB67 as the mechanism became sluggish resulting in its failure to register that the film had been wound meaning the double-exposure prevention had to be overridden. Of course this meant I had to pay careful attention to avoid double-exposures or accidentally skipping over frames. Not the easiest thing for me. As we've seen, my mind wanders.

There will probably be more winter photography to come over the remaining weeks. The replacement spot meter arrived today (see the previous post if you missed it) and I have some time off over the next couple of days to try it. I also have hopes that some of winter's more unique conditions will coincide with a time I'm free to get out there with a camera. It has to happen sooner or later. Still, if it so happens I don't squeeze off another shot until spring I can comfort myself with the thought that this year already winter isn't another season I let get away.


Wednesday, 28 January 2015

When The Tourists Are Away...

In past entries I've noted how, as a local, Niagara Falls doesn't have the sort of magnetic draw on my camera lenses that seem to hold sway with visitors to the area. For the past several years however it's been my intent to visit during the much more photographically interesting and visitor sparse height of winter. Past years have not been kind to my plans. Last year I let the unusual cold take away my photographic mojo which only returned when things warmed up, and the several years prior to that were too warm for there to be a real dead of winter.

It didn't occur to me at a time but coated and weighed down by ice this tree reminds me of a Shetland Pony.

Though not quite so frigid as last year, this January has been accompanied by some solidly winter weather, and with my mojo fully intact I finally set out to ensure another year wouldn't pass without getting a crack at the area around the Falls. It wasn't so much the Falls itself I was after, though they too take on added interest in the presence of great quantities of ice. The real draw was the heavy glaze of ice that covers almost everything in the surrounding area. The mist rising from the torrent below that in warmer months drenches countless unprepared tourists begins to freeze on the surface of anything that doesn't move as the temperatures drop, turning trees and other fixed objects into virtual ice sculptures.

I brought what has become my standard kit - Mamiya RB67 Pro S with all four lenses for it I own, 50mm, 65mm, 127mm and 250mm, three backs loaded with Fuji Acros for black and white, Kodak Portra 160 for colour and a roll of 35mm Ilford Delta 100 with my home made 120 adapter for panoramas, Manfrotto 055 tripod, light meter, and the usual sundries like filters, cable release etc. I also brought along the Minolta Hi-Matic 9 loaded with some Fuji Superia 400 I've kept in the freezer for about ten years. As I write this I have yet to finish off any of the colour rolls I was shooting that day so images from those are yet to come. Also, as the 35mm roll in the RB67 back had been a partial roll, I was unaware that there was only one frame left and since it has to be unloaded in the darkroom when finished I was unable to reload in the field. 

These windows are part of an odd looking rail-car, the purpose of which I can't guess. It's enclosed in its own little fenced off enclosure suggesting it has some sort of historical value. It has plenty of character and I'd love to explore it with a camera more but the fence itself gets in the way. I was able to see a bit more this day though by standing on a show bank.


If rainbows in b&w are not your thing I did get a colour version of this which you may see once I finish the roll.


As anyone familiar with the RB67 will realize this is quite a load, but my middle aged, desk job soft self can still manage a haul of a few KM over reasonable terrain when I've got it all loaded into the big photo backpack. That's pretty much what I set myself up to do when as usual I chose the free parking at the Dufferin Islands park and walked the rest of the way. I might have saved myself some effort had I realized that not only was this normally heavily maintained area neglected in the off-season, and that likewise they don't bother maintaining the tourist premium parking rates closer to the Falls when there are next to no tourists arriving. Though I could have avoided the slog, it's over now and I burned off all those extra calories.

If I had it to do over again, and with at a good month or more of winter yet to come I guess I do, I think I would have been better served if I had left the Mamiya at home in this case in favour of a Nikon used hand-held. Shooting tripod mounted is almost habitual for me but in this case I felt it held me back from exploring all the compositional options I found myself confronted with. I was glad of the Hi-Matic I brought with me, allowing me to be a little more free-wheeling though with one of the Mamiya backs loaded with Portra I found myself wishing I had loaded it with black and white film.


The one panoramic image I was able to get on 35mm film adapted to the RB67. As I had no idea how many shots were on the partial roll to begin with there was no way to know that there was only one exposure remaining and as it had to be removed in the darkroom I couldn't put in a fresh roll in the field.


Matters of shooting style aside however, this was one day that using a waist level finder, currently my only option with the RB67, put me at a disadvantage. This isn't always the case, and in fact there are times when using a waist level finder has been a revelation. For example landscape shots featuring a prominent foreground object often require shooting from an angle low enough to have an eye-level finder user crawling on their belly to frame up the shot. Even when the shot doesn't require such low angles, shooting with a camera held at chest level rather than the same height we are used to seeing the world from can subtly add interest to images through the slightly unfamiliar point of view. Putting my armchair psychologist hat on the lower eye level implied may even be suggestive of a child's point of view, triggering whatever emotional responses that might involve for a particular viewer. This waist-level point of view has been noted as an important component in Vivian Maier's style. Perhaps the child's perspective would also make sense in the work of the word's most (belatedly) famous TLR toting nanny. 

There's a flip side to this of course, as obtaining a perspective higher than waist-level requires a step ladder or some reasonable substitute. For example, in image at the top of the post I was aware that the top of the tree intersected with the top of the falls and that I could remedy this by raising the height of the camera but as I need to look down on the camera from above to see what was in the shot, doing so would have left me shooting blind. Like most medium format SLRs the RB67 has interchangeable viewfinders and I have considered getting an eye-level finder for situations like this. Of course to really benefit I'd have to bring along both finders and switch as needed, adding yet another item to an already heavy pack. Not as heavy as carrying a step-ladder with me mind you, so I may yet do this.

There are more images to come. The images here are from the first roll of Fuji Acros that went through the Mamiya as well as the aforementioned single panoramic image on 35mm film. In addition to the colour images still in camera there's a second roll of Acros with images from that day that's also waiting to be finished. As always I'll keep you posted.  

Thursday, 8 January 2015

Embracing the Elements

I expect things to slow down this time of year but somehow between the holidays and getting hit with that flu that's been going around it's been a month an a half now, which I didn't expect. With both of these things winding down now that just leaves the cold to contend with. The cold is an obstacle that last year all but brought my photographic activities to a halt, but it's also an opportunity so I've vowed that this year I won't let winter stand in my way, at least not to the same degree.


Winter changes everything. At least it does where I live and for most of you living at roughly similar or higher latitudes I presume it does for you as well. The land takes on a new character. Favorite subjects you/ve photographed too many times in the past can take on a new look. Scenes that might not have looked like much amid the cluttered overgrowth of warmer seasons are transformed by the barren cold and a fresh coat of snow. Even the snow and ice itself can become the subject for photographs that exist at no other time and may never appear quite that way again.

 If you're fortunate enough to live near one of the Great Lakes, winter offers another opportunity that exists in only a few other places in the world. The Great Lakes, any of them really, are a bit like little fresh water oceans. The the lakes are vast enough to be photographed as seascapes, but being fresh water, when winters are cold enough vast quantities of ice accumulate along the shore forming temporary desolate landscapes that differ from year to year.

It must of course change quite a bit over the course of a winter, but having always lived a few minutes drive from the shore I've never really gotten the sense of how it might change on a week to week, even day to day basis. This year then I resolved to visit the shoreline throughout the winter to see how things change, and of course take advantage of whatever photographic opportunities such changes might present. Only a few days into a cold snap following a green and rainy Christmas I made my first jaunt out to the beach yesterday expecting to see little more than the first hints of a line of ice clinging to the shore. Apparently I had the whole thing figured wrong. When I arrived at my usual haunt, the stretch of shore strewn with the ruins of the old Erie Beach Amusement Park, the ice had already created a new landscape of low wind blown hills extending perhaps a hundred metres out from shore. I had been hoping for less really. I had imagined getting images that included ice and water but the new shoreline was 100 meters further on across ice I knew better than to attempt to cross however thick it might appear.


After wandering around for quite some time and making a few exposures I didn't imagine would amount to much I finally found that it was possible to follow the old concrete pier that, back in the heyday of the amusement park had received visitors arriving by boat from Buffalo NY. Here I was able to get my seascape compositions complete with ice in the foreground I had in mind. The greater than expected volume of ice at last seemed like a bit of a bonus as it gave an Antarctic feel to the scene.

I don't put much stock in long term forecasts so I'll take the winter as it comes, which is my default plan for most things anyway. In any case there is more to watch than just what happens along the Lake Erie shore. There's also the Niagara River including the Falls and all the surrounding things mist might freeze to. Then there's all the streams, creeks, woods and so on. It just takes the time and, when the temperature starts to drop, the will.

Saturday, 8 November 2014

A Close Call

There's a long time running debate among photographers about the use of protection filters, nearly clear screw in filters like a UV or skylight kept permanently affixed to the front of a lens to bear the brunt of scratches and frontal impacts, sparing the lens itself. There are pros and cons to using them, and though back in the old camera store days I saw a reasonable number of lenses spared from disaster by them I remained ambivalent about their use.

Yesterday I had one of those experiences that tend to make people question position in matters like this. I set my tripod mounted RB67 down, removed the lens cap RB67 from my prized 50mm Sekor-C lens that was mounted to it and, turning my back to dig something out of the camera bag, just caught the whole assemblage toppling out of the corner of my eye, the camera nose diving into the ground. It seems the tripod legs weren't spread out as much as I thought. Now I have one UV filter that will fit any of the four lenses I own for the RB system, but though I value the 50mm above all others this isn't the lens I use it on. This is to avoid the possibility of vignetting in the corners of its wide-angle field (equivalent to a 25mm lens on a 35mm camera) if I stack another filter or two on top.

As the title suggests however this isn't a eulogy for my favorite lens. Good fortune intervened on my behalf because, while there was no protection filter on this lens, it so happened that I had left a red contrast filter in place after the previous shot I had taken.


A fallen red-coat who gave its life to save its unit, a sacrifice that will not go unforgotten.

After carefully removing the filter all appeared well with the lens and indeed I went on to use is and the camera for the rest of the day without incident. Better still, this is (was) just a cheapo no-name filter that cost me maybe $6-7 shipping included.

While I'm more than happy this filter was there to play the part of a protection filter that obviously wasn't what I had it for. I got this, along with a yellow and a 10 stop ND filter, more as temporary fill ins until I had the budget to replace them with something that didn't involve such an optical compromise. And it's this that brings us back to the reasons I'm not as religious as some about always having some sort of filter in place for protection.

"It's cheap insurance" is the phrase I've heard countless times from advocates of this practice. In a sense it's usually true, but cheap is part of the problem. A good lens may incorporate from six to fifteen or more precision made multicoated elements. A protection filter that could rightly be called cheap is unlikely to be either precision made or multicoated, but once in place it's just as much a part of the optical system as all the rest. Better filters are available of course but then we are getting out of the realm of what could rightly be considered cheap, and no matter how much money you sink into one you'll never achieve better than not using one at all and taking your chances. It also goes without saying that having a filter in place is only protection from certain kinds of mishaps. As you can see from the photo above the ground this fell on was mostly sand. Had it fallen on something harder or more jagged the filters sacrifice would have been in vain.

Still, the fact it can't protect you from all possible injury is a poor reason not to wear a helmet and the arguably the logic is the same here. It's also possible I'm being a bit unrealistic about how much a moderately priced protection filter will impact the overall optical quality of my lenses. Though I hope to add better quality contrast filters to my kit I don't sweat the fact the ones I have are bargain class when the shot calls for for one.

Has this experience been enough to change my mind then? For now all I can say is I ordered the replacement for the red filter today and, thought I gave it a moments thought to adding a few protection filters to the lot in the end I gave it a pass.

Tuesday, 2 September 2014

Trouble in Paradise


In my last entry I shared my experience with a day shooting transmission towers. What I didn't mention was a bit of a problem that reared its ugly head when the negatives were developed. Out of the 10 shots on the first roll I shot that day four were marred by streaks from an unexpected light leak, one of which is pictured above. Additionally when the second roll I shot that day was developed later on a fainter but still frame ruining streak was visible in one of those photos. This is certainly not a situation I'm prepared to live with.

While this came out of the blue and I'm still at a loss to understand the cause of this sudden onset light leak it's quite possibly something that was bound to happen sooner or later due to my lack of upkeep on what I suppose these days would be considered vintage cameras. I own two Mamiya RB67 Pro S's. Both work very well though the one that serves mainly as a backup isn't really much to look at. There is one issue they share that I've been ignoring up until now because it hasn't caused a problem up until now - the light seals, those little bits of foam and felt that keep light from leaking in through the cracks around the doors and whatnot, have been wearing away.

And in the RB67 it must be said there are plenty of places for things to go wrong. In a standard 35mm SLR as well as many medium format cameras such as the typical twin-lens reflex, the big potential for light leaks is around the back door that opens and closes to allow you to change the film. In addition to this any medium format cameras such as the RB67 also have interchangeable film backs that allow you to switch from one type of film to another mid-roll, and the interface between the back and the body is another source of potential light leaks. The RB67 though has still one more spot where things can go wrong. The "RB" stands for "Rotating Back" as this model allows you to switch from horizontal to vertical simply by twisting the back a quarter turn. The feature is more that worthwhile because, if you've never handled a camera this size believe me, it's not something you want dangling sideways from even the most solid of tripods, but it does create one more spot where unwanted light can sneak in.

There are a few tricks to diagnosing a light leak like this. To begin with I should note not all light leaks happen in camera, they can occur afterwards during processing or even before hand. In this case however I noted that the leak appeared in the same spot in each of the frames where it appeared. Since nothing that happens outside the camera would bear any relation to frame spacing this tells me my leak is inside the camera. Second, note that the light streak does not end at the edge of the frame. Since light leaking in from ahead of the back would be blocked from reaching the edge of the film like this by the frame mask that is part of the back this tells us the leak is coming from within the film back itself. Third, since it appears as a hard edged vertical line it would have come through a vertical edge such a the side of the door or the hinge. Last of all since it is at the top of the frame and does not extend to the bottom this tells us the leak is located more towards the bottom of the back since in the camera the image is projected on to the film upside-down.

I'm usually an ambitious DIYer and replacement light seals are not too difficult to fashion from craft store felt and weather stripping foam, but when it comes to my primary camera I'm through mucking about. A complete set of laser-cut seals for the RB67 from Aki Asahi for $12 US plus $4 shipping. I really should have ordered a set for both cameras. On the other hand I've been thinking of trying my hand at restoring my older RB and Aki also does laser cut replacement leather so maybe I'll give that a go. As always I'll keep you posted.

Sunday, 31 August 2014

A Day at Not the Beach


"Don't tell me, you're headed for the beach again right?"

In fact I hadn't quite made up my mind which way I intended to go as I headed out the door, oversize photo backpack and tripod in tow, but my wife's almost chiding tone, with it's implicit suggestion that maybe it was about time to get a bit more creative with subject matter, brought me to the instant decision that whichever way I was headed, it wouldn't be towards the beach. It was the last day uncommitted day I had left out a week off work in which I'd been disappointed time and again by the harsh light and bland, featureless skies that characterize the kind of weather conditions most people refer to as "perfect". The skies were still blue this day but for once there was smattering of cloud to break the monotony - the kind of day polarisers (or for we black and white photographers red contrast filters) were made for. And now I found myself with a small dilemma, if not the beach then where?

After an uninspired hour or so wandering random back-roads of the Niagara Peninsula I found myself nearing subject matter I'd had in the back of my mind for some time but had never really explored - one of the power corridors leading west from the Canadian half of Niagara's hydro electric generators into the rest of Ontario.


I wasn't that familiar with the particular road I had taken that was leading towards the towers, so I was pleasantly surprised to find that there was a small dirt road that lead through the fields traversed by the power corridor. My guess is it was put in place for Ontario Hydro service vehicles, but it looked like it was probably frequented by hikers and signage forbade only motorized vehicles. I had at once a nice computational element and assurance I was free to wander without risk of being considered a trespasser.

I had only recently obtained a set of black and white contrast filters in the 77mm thread size used by all of my Mamiya lenses and this was the perfect chance to try them out. For those who aren't familiar, these are plain coloured filters made to use with black and white film. The point, if that strikes you as a hair-brained notion, is that a coloured filter allows light with a similar colour to pass, while blocking and therefore darkening dis-similar colours. Thus the blue of the sky will be darkened by (in order of increasing strength) yellow, orange and red filters while (after exposure compensation is taken into account) neutral toned clouds are relatively unaffected.  As was done in all of the photos here, using a red filter like this on a blue sky with white clouds gives a result similar to using a polarising filter.


A nice discovery, and this is just one mall stretch of an extensive network. I just may find myself exploring it further.