Showing posts with label photography. Show all posts

Sunday, 3 March 2019

Colour Conundrum pt. 1: "Kodak 5"


Colour Photography and me, sometimes I just don't know. It isn't that I have issues with it as a creative medium. Sure, black and white is it for me 90% of the time but there are times when colour is an important element. The trouble is more of a practical thing. It's easy enough to carry and extra back loaded with colour film for just those occasions. The problem is what to do with the stuff once it's been shot. Gone are the days when it was a simple matter to find a local business that could handle the processing for you. The answer should be simple enough - I know my way around the darkroom (I can do it with my eyes closed!) and colour chemistry isn't that hard to get my hands on. The trouble is a batch of C-41 chemistry only lasts for a couple of months once mixed. On average over that time span I'll probably not even shoot a single roll of colour. If I were to shoot E-6, which I'd love to, that's even worse. 

A popular option these days is to ship film away to a lab but shipping one roll at a time adds a lot of expense and if I'm going to wait until I have several rolls I might as well just do it at home. I have all the stuff after all. And so it is this is the option that I have gone with. Sounds like a near perfect plan given the circumstances, right?

Well... maybe. I'm no stranger to the C-41 process. It's fixed, predictable if you stick to a few simple guidelines with no adjustments required in time or temperatures to match a particular film, they all get processed the same way. In many ways it's easier and faster than processing a typical black and white film. Still, for reasons I'm sure had little to do with problems or inconsistencies at the development stage, recent results have fallen a little outside what I was expecting.

To begin with I had 6 rolls of film to develop: One roll each of Kodak Portra 400 and Ektar in 120, two rolls of Agfa Optima 400 in 220 that expired some time in the late 90's, a 120 roll of Lomo 100 and a roll of Fuji Superia 800 that went though one of my Nikons though I can't remember which. Together these represented all the colour film that that completed it's journey through my various cameras roughly over the past year, though in many cases they seem to have been sitting in camera for a much longer time than that. All were developed in the same batch of a 1L Unicolor C41 kit that I ordered from the Film Photography Project. It was recently mixed though I had the kit sitting around as dry chemicals for about a year and a half which should be well within expected shelf life for the unmixed chemicals. This is a two part series and here I'll be discussing the results from the Kodak emulsions and I'll follow up next time with some thoughts on all the rest.

Given that these were the most mainstream of the emulsions and, except for the Lomo, the freshest, these films gave me the most surprising results. Both of these went through my RB67. Like the other two medium format SLR systems I own it has interchangeable film magazines allowing me to switch mid-roll from one film to another and I've used this capability in the usual way to switch from the usual black and white to colour film when it seems appropriate. For the record it has always been a consistent performer the black and white images I have made with it come out just fine.

Portra 400

The Portra 400 had been loaded into the camera no more recently than 2015. I know this only because it contains a particular image, the black and white version of which first appeared in my portfolio in that year. There were only 4 (out of a possible 10) shots on the roll but it's been so long since I shot it I can't remember what might have happened that it was never completely shot. That's just how seldom I use that camera to shoot colour. For all the time it's been sitting there it's still surprising that there were such obvious issues with it. All of the images showed some degree of odd mottling. The first image was by far the strangest with a series of discoloured lines running the width of the film. Here's the straight scan:


The remaining exposures weren't nearly so affected but this odd mottling was evident in all of the exposures. Yes it's been sitting around for a while but I've developed film much older than this, including some that I'll discuss in the next instalment that was developed at the same time in the same batch of chemistry without any such issues. It's hard to say what's causing this. It's clearly not any sort of light leak as it seems to be just a variation in colouration and is worse on the first frame that would have been sitting closest to the centre of the exposed roll. One clue might come from the last of the 4 frames in which the otherwise random mottling shows one clear pattern. A cropped in image of this should make it plain enough...

And in case it's not clear where this might have come from here's a portion of the backing paper from that same roll:

I can only guess that this is the result of some sort of chemical reaction with the ink used to print the frame markings on the backing paper though curiously, to me anyway, there are no markings on the backing paper to match the lines seen in the first frame. Maybe the readership has some better suggestion?

I liked this final frame though, so just I decided to take the scan and clean things up as best I could digitally. The "Kodak 5" was gotten rid of easily enough but you don't have to look too closely to see the mottling.  If you can ignore this though I'd say I like the shot


Ektar

The second film that had gone through the RB67 was a roll of Ektar 100. It came out of the camera several months ago. If there were thoughts that the issues with the roll of Portra might have had something to do with whatever the problem must have been that caused me to shoot less than half of it most were dispelled by comparing it with this roll. Though it hadn't been sitting on the shelf nearly as long as the Portra, it also had a random mottling pattern throughout the roll and here the first three frames were plagued with particularly prominent lines that again spanned the width of the film, and again it was the same sort of greenish discolouration. Here is the third frame from that roll.


Image anomalies aside though it seems to me this roll came out much differently than any of the others. Ektar is known for it's reasonably bold colours but these seem punchy beyond reason to me. I mean it's still a fairly standard film not unsuited for standard portraiture. For example, while I'm no geologist I'm sure the rocks in this images are practically identical to the ones in the example Portra image above it that was taken about 30km away along the Lake Erie shore. They certainly don't strike me as being this sort of Mars red when I look at them. Curious indeed.

If Kodak C-41 films were generally problematic like this then I'm sure my experiences here would be old news. On the other hand if something is wrong on my end like I got a bad batch of chemistry or maybe I've just really gotten out of touch with good colour processing practice then you'd expect these problems to carry over to the other rolls I developed in this batch as well. In my best go at creating a cliff hanger then, that's what I'll look at in the next instalment so please stay tuned.


Saturday, 4 August 2018

Sack O' Beans


There are a lot of reasons I gravitate to medium format SLRs and one of the major joys of using them, to me at least, is how naturally they work with waist level finders. I'm not the only fan of the WLF out there of course, but not everyone loves them for the same reason. Some street photographers appreciate them for the unusual chest to waist level perspective, the not so off-putting way it has you looking down rather than directly at your subject, and for some I'm sure just the fact that it's the way Vivian Maier worked is reason enough. As someone who focuses primarily on landscape subjects however merely getting down to waist level is often not good enough. The ideal perspective for me usually has little to do with the standard eye-level view of the world we see day to day, and more often than not I find that means getting low. How low depends on the subject but waist level, knee level, even ground level, I find occasions for them all. The WLF saves me from having to get down in the muck for low level shots as would be needed if I were using a camera with an eye level finder. But just because I can frame and focus down at ground level is only half the battle. Since I rarely shoot hand held supporting the camera down there presents challenges of its own.

My trusty Manfrotto 055 at its lowest.
My trusty Manfrotto 055 tripod with its splayable legs and sawed off centre column is set up as well as it can be for the low perspective. It's just fine for most of what I do, but even at its lowest it only goes down to about knee level. If I chose a different tripod head it could probably go a bit lower still, but not much I don't imagine. I even own an old Manfrotto Super 3D head that would in theory allow me to invert the centre column so it's hanging underneath the tripod then flip the head around to keep the camera upright and go down nearly to ground level. If this sounds a bit awkward I have to say that until you've tried actually shooting this way you don't know the half of it. Even in the normal upright position I've always found this head less than ideal and at any rate it's not really made to handle larger cameras.

I've tried other solutions for getting lower. I have a clamp that attaches to the tripod leg and supports the camera from there but when you add the necessary tripod head to it it's as bulky to carry as the tripod itself and not much more fun to use than trying to invert the centre column. There's other solutions I'm sure, and probably much more workable ones such as more flexible tripod designs, ground boards, and the like but it's going to be hard to justify the price of any of those even if they can match the simplicity, reliability, and portability of something I found lying around the hall linen closet unused and forgotten about for probably over a decade.

My Sack O' Beans (pictured at the top hiding under the RBeast) was never intended by its manufacturers to be a photographic accessory. If memory serves it was made to be thrown into a microwave until suitably toasty then placed against a sore back or some such. The practice never caught on around here and it eventually wound up on a box of things to donate until the notion occurred that there might have a place in my camera bag. I'm sure there are other kinds of equally suitable bean bags sold for other purposes. There are even bean bags made for photographers but for my purposes I'm not sure what if any advantage they would have over my closet find. It's about the right size for the cameras I like to use, neither too light nor too heavy, enough give to accommodate itself to the shape of the camera and whatever surface it's on but firm enough to hold steady once it has. I don't believe it's water tight but it's tough enough to throw in the wash if exposed to any soggy nastiness. For something that would otherwise just have been thrown or given away I could hardly do better.

The Sack O' Beans in use. Results below.
 Now using bean bags as support for a camera is hardly a new idea but most of the ones I see on the market are targeted at wildlife photographers. These usually have a sort of folded over design intended to be thrown over the edge of a window or car door, which is great I suppose if that's how you're likely to be shooting. I don't know that these would be particularly good in situations that didn't involve a window, especially not when the idea is to get right down to ground level. For more general use I don't know if there's a better design than a simple pillow type bean bag. Mine was purchased at a pharmacy originally and I haven't modified it in any way. I don't know what other purposes suitably sized bean bags are sold for these days but I'm sure there are many I'm just not thinking of right now. If you're handy sewing, or know someone who is and would be willing to help, it would be a cinch to make one. I tried this myself years ago by re-stuffing an old decorative pillow with navy beans. Not a bad idea but navy beans are too large in my experience. I'd go with something more pea-sized if I were to try that again. Also decorative pillows aren't very tough when it comes to field use. Just sayin'.

While using a bean bag for support might seem like a step down from the stability of a tripod I have successfully used mine for long exposure photography without issue. Using mine with either the Hasselblad 503cx or RB67, so long as I can get the mirror pre-released without nudging anything and use a cable release for the shutter, there's little chance anything is going to move during a longer exposure. Just pressing the shutter release by hand is a little tricky with most medium format cameras designed around a waist level finder, both of mine included, because the shutter release is at the bottom where it tends to sink into the bean bag if it's not carefully positioned. I tend not to shoot this way and can't really attest to what kind of shutter speeds you might be able to get away with shooting this way.


The image above was shot at 1/2 second using mirror lock and a cable release. (All the "something seems to be afoot here" jokes have been made in advance so let's just move on then shall we.) I imagine I could have made something of the subject if I had to shoot from the tripod but I'd be pretty much shooting down at it, losing the sky, and it just wouldn't be the same. I may not use it every outing but the Sack O' Beans tucks away into a little bottom compartment in my large camera pack where I can pretty much forget about it until needed.

The Sack O' Beans is the most obvious example of a photographic accessory that was never intended to be photographic accessory but there are others, especially in the darkroom. They often offer neat solutions without the price tag associated with specialty photographic items. I'm sure there are plenty of useful examples, maybe some worth devoting a future episode to?

Friday, 8 June 2018

Sunny Days Are For Barbecues


In my part of the world we've been having a lot of the kind of weather you normally spend most of the year hoping for. I'm glad of it, it's good for so many things. It's just that photography isn't really one of them. That's not to suggest that brilliant warm cloudless days and worthwhile photographs are mutually exclusive. The above image was made on just such a day and I'm happy enough with it. It's just to say that if I'm looking for weather that will lend itself to interesting images, perfect is less than ideal.

 All of the images you will see in todays episode were made during a single afternoon jaunt down one of the many out of the way and relatively unknown glens the Niagara area is blessed with. The day was, by most standards, ideal - warm though not at all uncomfortably so and not a cloud in the sky. Take away the fact that I had come intent on doing a bit of photography one might have deemed the day perfect. The perfect day for a hike, or if that's not your speed maybe a picnic or a back yard barbecue. For photography though, not the kind of day I would have chosen.

Many of you will know what I'm talking about here and the images below should atest. Though I worked as meticulously as possible with the spot meter to keep as much shadow detail as possible without sending highlights into that irretrevable upper plateau of the contrast curve the images still look, I don't know, blasted. It's not a technical thing that can be managed. I could be wrong but I imagine that even if I was one of those photographers who used the Zone System in it's full form and had worked out an N-1 development I can't imagine it would have helped much. Harsh light is harsh light. The things that typically lead us to describe this kind of day as beautiful just don't translate well onto film and/or light sensitive silicon chips if that's more your thing.


These are all straight up quick and dirty, un-played-around-with scans. As I'm sure most of you would be quick to point out they are all long exposures made with a 10 stop ND filter. Long exposure images on film can be contrastier once reciprocity failure kicks in, but all images were 60 seconds or less shot on Fuji Acros which, as I discussed last time, is well within the pre-failure portion of that film's reciprocity curve so I don't think this has contributed to the overall sun-blasted look.

Now some of you may be thinking some of these images are pretty okay-ish. It might be interesting to re-scan one or two of these a bit more carefully and see just how much could be done with them. If these were images taken in some some exotic location I was unlikely ever to get back to I might be tempted to try. As it is I usually visit this place a few times a year.

For comparison here is an image made in the same glen on a different sort of day two years previous. The light wasn't completely bland but it has a feel I don't think could ever be extracted from any of the examples above.


And just to make the obligatory point that there are no hard and fast rules when it comes to this sort of things there's that image at the top that I think is a keeper. It was made on the same day and in the same conditions as all the much too harsh image examples. Hard light has it's strong points, especially earlier or later in the day when it comes from the side rather than straight down from above. It's often what's behind those particularly dramatic effects, backlight, grazing light and whatnot. I think something like that happened in the image with the girl below the waterfall. (Every photographer should know a girl who is fond of waterfalls.) It was still mid-afternoon when this was taken but the slope of the north-facing waterfall seemed to be just such that it was catching the light at a bit of a grazing angle. This was helped along by the difusing gossamar like quality of the water in long exposure (it also helps when the girl who likes waterfulls is really good at holding still!)

In the end the message is that if you head out with a camera on a bright sunlit day you might come back with something more than just tan-lines. You might also want to wait for a day when your chances will be better. After all, it's the perfect kind of day for a barbecue.

Thursday, 5 January 2017

The Once and Future Ektachrome


This isn't a regular post, but I thought if today's announcement from Kodak was enough to warrant a double take from me it might be something readers would be interested in knowing. In this post truth era when I saw this my first instinct went something like "yeah, right", but the words are right from the horse's mouth and up there from the world to see at Kodak.com. In short, those words are:

"KODAK EKTACHROME. We're Bringing it back."

Kodak made the announcement today at CES 2017 in Las Vegas and there are a few more details available in their accompanying press release such as:


  • Ektachrome will be in development over the next 12 months with initial availablility expected in the last quarter of 2017
  • It will be manufactured by Kodak factory in Rochester
  • Plans are to release Ektachrome as a Super 8 motion picture film and additionally in 35mm cassette format for still photography. 

The decision to bring back Ektachrome seems largely to intended as a compliment to Kodak's efforts to revive Super 8 film making by offering a film stock that can viewed directly in a projector. With the dwindling lineup of reversal films being offered by Fuji this, along with the progress still being made in the heroic efforts to revive Ferrania, can only be good news for fans of E-6 colour photography. Even more, for any photographer who has seen a treasured emulsion disappear, it's affirmation that a favourite film, though possibly somewhat transformed, can indeed come back from the dead.

Saturday, 17 December 2016

Back Into the Vortex


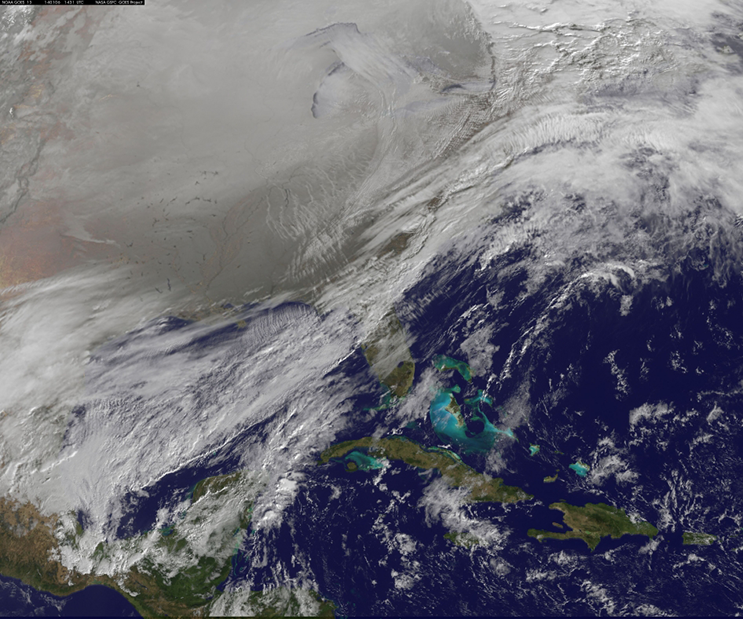
Two years ago I posted "Budget Time Travel : A Photographers Guide" explaining the notion that, at least in sorts of latitudes where I live, winter photography can transform familiar, well worn scenes into something other, providing the photographer willing to brave the cold with an alternative to long distance travel in order to find fresh subject matter. That was written during the winter or 2014-15, the second year in a row in which a weak polar vortex failed to keep arctic temperatures confined to the arctic, allowing them to run amok over the eastern half of North America including the Great Lakes region. Last year though the term 'polar vortex' which was becoming oh so familiar was replaced with 'El Niño', and with it came more mud than snow. While this was a relief in just about every other way, it didn't make for much photographically.

NOAA/NASA GOES Project Image
So here it is, mid-December 2016 and for the third time in four years we're hearing about the polar vortex again. Really I've been hearing the term bandied about since the summer, usually in discussions that started with the old "they say it's going to be a nasty winter" without any mention or probably even conception about exactly who or what "they" are. It wasn't really until just this week when a normal, possibly even warmer than normal autumn suddenly gave way to mid-winter conditions that I took much notice. Not that I or anyone else who lives in this part of the planet had much choice if they had any plans involving stepping outdoors.

As this cold weather snap coincides with that time of year where days are so short I drive both to and from work in the dark it wasn't until yesterday I had some free time during daylight to take advantage photographically. Given this is also the time of year for holiday preparations it was not a whole lot of time though, so with time constraints I decided to stay in town and make the most of my favourite local well trodden subjects, a decision it seems that turns out to have been the right one.

Take the lead image for example. Some readers may recognize the subject as that same crumbling break wall that was featured in my post almost exactly a year ago in "One Subject, Many Approaches II". It also appears in the post just previous to this. Other than being some structure jutting out into the water, with its thick coating of ice it seems almost unrecognizable here. I had actually headed out the door on bright sunny morning to do some shopping but noticing the heavy band of clouds hanging over the lake turned around and collected my Mamiya gear. It was only in the last few hundred metres of my drive out to the lake that the sun became obscured by cloud cover. That came as a bit of a disappointment as I'd been hoping to capture a dramatically sunlight foreground to make the dark clouds over the lake seem even more dark and ominous but looking at it now that might have been too much contrast. The clouds are plenty dark on their own. It only got cloudier the longer I stayed and before long I was having to take measures to keep the falling snow from collecting on my equipment.

I made the mistake of leaving without a good cable release. I had the $5 cheapie that sits at the bottom of the pack as a spare but after an hour or so in the cold that came apart and with the diminishing light as the once distant clouds moved overhead started bringing exposure times uncomfortably low to manually release even with the tripod I decided that shopping I had shouldn't be put off too long. I did manage to slip out again later that afternoon just to finish the last half of the roll that was in the camera.

I guess it's possible that this cold snap may be just the prelude to an otherwise normal winter. If so I was glad I got this chance and there will no doubt be a few more notable days before the season gives way to spring. On the other hand given how things so far are right in line with what the meteorological pundits have been saying, and experience with other recent winters, this may be just the tip of the iceberg.

Finally, for your enjoyment, here's some more from my first photographic foray of the new winter:


Saturday, 28 May 2016

Shooting below the belt.


For most people it seems photography is something that takes place at eye level. It's almost an ideal - the camera as an extension of the eye. So it is that the vast majority of cameras made over the last several decades have been designed to use by being held up to the eye. In this way photographers can expect to photograph the world the way they naturally experience. The thing is, sometimes the whole point of photography is to see the world in new ways, to find in the world of familiar experience aspects of the unfamiliar. While cameras designed to mirror the way we look at the world everyday may be the norm, it doesn't have to be that way, which is probably why I, like so many other photographers, have become a fan of the waist level finder.

These days cameras with a waist level finder, or WLF, are an uncommon enough phenomenon that I should probably take a moment and make sure everyone is clear on what I'm talking about. In the most general terms if a photographer has to look down at the top of the camera to frame up the image this is called waist level viewing. camera is designed such that the photographer frames up the scene by looking down at the camera to view the image this would be a waist level finder. In the years after George Eastman brought photography to the masses waist level viewing was common in the cameras of the day by virtue of mirrored viewfinders such as you will find in nearly any old box camera. These offered a handy reference for roughly what would appear in the image but the straight-through viewing of a view camera or a rangefinder were employed when some aid to focusing was required. The waist level viewfinder photographers from the mid 20th Century on came to know are the natural result of the introduction of reflex cameras, twin lens reflex (TLR) and single lens reflex (SLR). In a reflex camera the image from the lens is redirected by a mirror to a focusing screen at the top of the camera. A TLR uses a separate lens matched to the primary taking lens, while an SLR mirror redirects the image from the taking lens for focusing then flips out of the way during the exposure. A waist level finder is simply an aid to viewing the image on the reflex focus screen directly by providing a shade for the screen that normally collapses out of the way when not in use, and which will often incorporate a flip up magnifier to aid with critical focus.


But while waist level finders are a mainstay of TLRs, they are rare in 35mm SLRs and to my knowledge unheard of in DSLRs (which after all, are just SLRs that happen to have digital sensors). Instead, a special five sided prism, a pentaprism, is employed, redirecting the image to the back of the camera, correcting as it does the mirror reversed image that occurs when a reflex focus screen is viewed directly. Since this viewing arrangement using a pentaprism allows the photographer to bring the camera to their eye, effectively looking right through it from the back, these are often referred to as eye-level finders. Whatever you call them they are a built in feature on the vast majority of 35mm SLR cameras, meaning that despite their reflex design this class of camera adopts a straight through, "extension of the eye" viewing style more natural to other camera designs such as rangefinders.

But while waist level finders are a rarity in the 35mm SLR world, this is not so when it comes to my usual weapon of choice, the medium format SLR. Once the mainstay of professional wedding and portrait photographers these cameras typically feature a more modular design that usually includes an interchangeable viewfinder system, While photographers could opt for a more expensive, and therefore often considered premium eye-level finder, this did not automatically make them everyone's first choice. For a variety of reasons waist level finders are a much more practical option with medium format cameras than is the case with 35mm. To begin with the focus screen is physically larger, matching the negative size, which makes direct viewing much more comfortable. A definite weakness of the WLF is that they are rather awkward when the camera is turned sideways for vertical shooting, but many medium format cameras are either designed for square formats where there is no vertical, or feature rotating film magazines that allowed a switch between vertical and horizontal shooting without the need to rotate the entire camera. Thus while some saw the more economical waist level viewers as an entry level option many photographers stuck with them throughout their careers despite having the option to easily upgrade.

Vivian Maier and her Rolleiflex. The kids today could
learn a thing or two about taking selfies.
There are a few reasons commonly sited for this. In discussions of the work of Vivian Maier for example it's frequently conjectured that her work benefited from the fact that  that the waist level finder of her Rolleiflex camera made it less obvious to her subjects that they were being photographed since she was looking down at her camera, diminishing the sense that they were being observed. That's all well and good for a street photographer but given my bent for landscape subjects it's hardly a reason for me to be a WLF fan. In simplest terms for me it comes down to the way this kind of viewfinder simplifies and encourages the use of lower camera angles, everything from chest level all the way down to the very ground itself.


From our usual eye level vantage point of perhaps 1½ to 2 metres our attention is most easily drawn to things at a similar height, most especially other people which is fair enough, but it does make it easy to overlook what's going on closer to the ground. There's a lot of interesting things to be found near the ground, almost (so the joke goes) as if they were drawn there by some mysterious force; rocks, seashells, sun bleached antelope skulls, creepy old dolls, forgotten and discarded, once loved by a little girl now in her mid thirties. And yes, we could photograph all of these things by standing over them an shooting down as they lay at our feet, but I hardly think I need to explain why this approach is so unlikely to lead to anything that is interesting photographically. It's just a patch of ground with something laying on it.

Get down closer to the level of that whatever it is though and everything changes. There is context, meaning, story. That seashell stands alone against the expanse of sand water and sky from whence it came, the unfortunate antelope amongst the scraggly vegetation struggling up from the cracked dry earth,  a victim of its harsh surroundings. That creepy doll that somehow found its way to the base of a knotted old tree in the sinister gloom of a misted wood where.. my god, did I just see it move?

You could of course photograph all of these things using a camera that has some sort of straight through camera. For the lucky there will always be a spot of dry ground to shoot from, and for the intrepid one can simply endure going belly down into the wet, the muck, the unidentified vegetation that to the best of recollection isn't exactly what poison ivy is supposed to look like and that bit of a mound that, if it's home to fire ants, you'll know soon enough. But even granting such acts of machismo might be your thing that eye level finder is hardly drawing your attention groundward, inviting you to explore the world from a new point of view and encouraging you to explore the visual world from this new perspective. For that, there's the waist level finder.

Of course my weapon of choice is the traditional medium format SLR where this style of viewfinder really shines. There are WLF alternatives for some 35mm SLRs. For vintage aficionados they were sometimes standard in early SLRs of the 1940's and 50's, but if you're after something more recent all but the most current members of Nikon's F series have interchangeable viewfinders and while uncommon there are WLFs for these cameras out there. Alternatively however a right angle finder that fits over the eyepiece of the prism viewfinder is available for a greater variety of 35mm cameras giving many of the same benefits while rotating versions eliminates the limitation of horizontal only shooting. These of course can also be the ticket if you shoot with a DSLR, though you can bet that if I were a digital shooter I'd chose a camera with one of those nifty articulated live view screens.

Admittedly there are times when waist level finders are not the ideal thing. They are good up to about chest level but no higher, and sometimes either to get the needed perspective of just to shoot over a fence this is a severe limitation. Once or twice in a pinch I have turned the camera sideways, standing at a right angle to the subject, just to be able to use it at eye level. For my Mamiya and Hasselblad systems however I have prism finders that can be swapped in for the waist level versions. These might actually get used, if I'm being generous, about 5% of the time and if I leave them in place after using them I inevitably replace them with the usual waist level finder in the next shooting situation because the eye level view just isn't working for me.

The 'Blad with waist level finder attached, optional prism finder to the right is ready when needed.

There are times when 35mm would do just fine but I still bring the medium format gear not because the bigger negative is suddenly important to me, but because I know the eye level finders I have on all my Nikons will almost certainly bring me to a choice between belly crawling on some questionable terrain or not getting the shot I want. And while I'm fully kitted out for 4x5 I'll still nearly always go for the medium format gear bag on the way out no so much to avoid the extra heft (though there's that) or the extra expense (thought there's that) but because, again, there's that straight through viewing. There are things on my photographic horizon (to be discussed in future episodes I'm sure) that have me thinking hard about shooting those big negatives more often. There are right angle viewers available for 4x5 cameras... It seems the wish list never quite ends.


Tuesday, 3 May 2016

Pinhole Day 2016

It's a darn good thing somebody goes to the trouble of organizing the annual Worldwide Pinhole Photography Day. I wrote about the tribulations I experienced during the 2015 WPPD while I was still shaking out some of the bugs involved in using the 8x10 pinhole camera I had built the previous autumn, the details of which you can also find back in the September 2014 archives of this blog. Consisting of a box with a teeny hole at one end, the camera itself wasn't the real issue so much as the here were no real issues with the camera itself on that day so much as dealing with the resulting exposures, namely the contrasty, highly scratch-prone x-ray sheet film employed. I was trying something new so it was the usual case of learning a few lessons and making a few adjustments. The trouble is that with everything else going on in my photographic life I didn't get around to trying out those new adjustments until WPPD 2016 came along and lit a fire under it.

My choice for entry in the WPPD 2016 on line gallery - image #1234 as it happens.

Worldwide Pinhole Photography Day itself is an event simply to celebrate photography in arguably its simplest form and to raise awareness of the power and expressive potential of photography done with traditional materials and tools. It's also a great educational opportunity. Grade school children can build pinhole cameras from materials as simple as a shoe box, baking foil and a bit of tape, load it up with a sheet of photographic paper then after making an exposure develop the image using a simple darkroom setup, all in the course of an afternoon. It's science and art all rolled into one. For me though it's simply a reminder that pinhole photography is something I have in my photographic repertoire, or it's supposed to be anyway. I shouldn't need the reminder, but there it is.

While WPPD falls on the last Sunday of every April my day job allows little consideration for weekends, so as had been the case with the previous two WPPD's I participated in I did not have the full day to work with. Just as well perhaps as with two 8x10 film holders to my name I was limited to making four exposures. I had a few locations in mind that weren't too far from where I work so it was a cinch to get it all done on the way home.


Making the exposures was the easy part though. I still had to deal with getting those large finicky x-ray negatives developed. I wrote about my results from last year in Pinhole Day Misadventures so I won't reiterate the issues I ran into here.  This year however I had the hangers and tanks at my disposal so I wasn't expecting negative scratches to be an issue and as it turns it wasn't. My second concern was the excessive contrast I have been getting from x-ray film with standard film developers. Though it can be developed by inspection under red darkroom lighting, the Xtol I used last year resulted in empty shadows despite developing until the highlights were as dense as I dared. My current standard, PMK Pyro, is a compensating developer and would probably give much better results. The 8x10 tanks however require a full 5 litres of solution, and while I probably had enough on hand to mix that much it would have left me short in short supply for other purposes. Having raw ingredients on hand I did a bit of research and decided on a particular Caffenol formula called Delta Micro. Formulated for low speed, high resolution micro films which have similar contrast requirements it seemed right for the job, and what do you know, it actually worked as well as I'd hoped.

Developing by inspection again I found that, unlike the Xtol which brought up a clearly visible image in about 15 seconds, it was several minutes in the Delta Micro before I could see anything happening at all on the film resulting in just a little bit of panic, holding the dripping film hanger up to the safelight to satisfy myself I saw some sort of image forming. Though I didn't time anything it seemed about 10 minutes until they appeared ready to move on to the stop bath. The negatives looked good, displaying a nice range of tones similar to those I expect from standard negatives. The only trouble I , could see were some areas, mostly towards the middle of the image, where they seemed to suffer from a sort of hazy fog. Maybe this was the result of having x-ray film, with its notoriously short shelf life, sitting in film holders for the better part of a year, or maybe it was all that close examination holding the developing negatives up to the safelight. Future experimenting will be needed to sort that one out.


It wasn't horrible but the negatives were denser and lower in contrast in these areas, creating a challenge in the darkroom, especially since I was contact printing which made it a little harder to judge exactly where to burn. For the most part they contact printed well on Ilford MG-IV RC with a #3 contrast filter which was replaced with a #5 filter when burning in those denser areas. The results were okay-ish, but I gave in and did a bit of extra work on the image of the railway tracks in Photoshop after scanning in the contact prints to help even things out a little more. There is still a little of the effect visible in the image below of the graffitied overpass pillars as it occurred to me the fogged area just happened to fall on exactly the right area of the image to resemble a slight mist, though no such mist was actually present.


Each participant can submit only one image each year to the WPPD online gallery. It's not a competition, there are no prizes, images are not judged or ranked in any way and there are not sort of minimum standards to be met other than that images must have been taken on the day of the event with a lensless camera of some sort. I would have been happy with either of the images here, but the perspective and foreground details made the railway bridge shot an easy choice. I filled out the online submission form and uploaded the image. In 2014, the first year I entered, my image came up as #888, and I was pleased it was something so easy to remember. This year I have image #1234. If I'm going to be lucky like that, why can't it be the lottery. (Answer: Because I don't play.)

There may be a few kinks left to iron out but with these results I can see the potential for achieving a unique look that is desireable and can't be matched using standard lenses. Yes I have plenty of other pots on the go, so to speak which I'll no doubt be writing about with equal enthusiasm in the weeks and months to come. Still, there's no shortage of things I hope to do and explore with pinholes, and there's still plenty of x-ray film in the freezer. Hopefully it won't take WPPD 2017 to get me out with it again.


Thursday, 31 March 2016

A winter of... meh

Taken with the Bronica S2a with a 75mm Nikkor-P lens with an orange contrast filter on Ilford HP5 Plus.
Last year I wrote at length of my photographic revelry during the winter of 2015, a year in which Lake Erie came very near to freezing over completely. I noted how winter, at least at my latitude, can transform a landscape that was feeling a bit photographed out into something altogether fresh, and how I was therefore looking forward to what the winter of 2016 would bring. Well, it looks like for the most part El Niño put the kibosh on that idea as Winter really only put in a few token appearances this year. 

I was perhaps being a bit too optimistic in my hopes that this year would be anything like last. El Niño aside the consistently frigid temperatures of the previous year certainly seem to have become more the exception than the rule these days. But although the ground remained conspicuously un-snow-covered much of the time, there were still those token appearances, temperature drops lasting the better part of a week that, while they were too brief to produce the grand ice desert landscapes of the previous year, did bring about a few situations that wouldn't occur at any other time of year.

Case in point is the image up top. The glazed structure in question is part of concrete remains of the long abandoned Erie Beach Amusement Park that is my default destination when I'm not up for a drive out of town and don't have any better ideas. The doorway here leads into a sort of concrete room of sorts that served who knows what purpose back in its day, which is at one corner of a sort of sea wall that encloses about a hectare now overgrown with trees and cat-tails for, again, who knows what purpose. On brighter days it's possible to see to the bottom of this "room" to a floor of rocks and broken concrete, along with the occasional beverage containers and other artifacts suggesting periodic exploration by those presumably much younger than I. Photographically it's always been a bit of a challenge to me in that it seems like something that should be more interesting than any of the images of it I've come away with.

On this day however the combination of strong winds and a particularly brutal (at least in context of this winter in general) snap of cold had transformed its gratified concrete walls into something other-worldly.  In a colder year in fact it's something that wouldn't have happened at all as it wouldn't have been possible for the wind to spray the surface with water, which then froze, had the surface of the lake been frozen over. Those wild conditions had happened the night before. Things were nice and calm the next day when I got there, a few somewhat eerie clouds having moved in to compliment the mood. As you can no doubt guess rendering them as such required no small amount of burning in, accomplished here via Photoshop as the darkroom has become temporary storage through the winter while work has been going on elsewhere in the house. I'm guessing this is something a lot of home darkroom practitioners out there would relate to.


If the story of cold combined with strong winds on Lake Erie coating things with ice this passed winter sounds familiar it may be due to an image that widely circulating around the internet last January depicting a car frozen in place and completely covered over in a layer of ice. This happened in Buffalo NY, just across the way from me and, surprise, was the result of the same set of circumstances that gave that car its frosty coating. I somehow doubt that my image will make its way around the internet to the same extent. It's a shame too because, while I'm admittedly biased, I think mine is the better photograph.

Monday, 14 December 2015

One Subject, Many Approaches II

The Wall and The Bright Side of the Moon

This past summer I wrote a post called "One Subject, Many Approaches" where I looked back on the results over the years of my efforts to photograph the same subject I'd photographed many times in the past, all the while trying to keep the images fresh enough to avoid the creative dead end of making essentially the same photograph again and again. In this sequel episode I'll be presenting another one of those well worn subjects I keep returning to. It is the crumbling remnants of a concrete break wall that once helped still the waters for revellers at the long defunct Erie Beach Amusement Park. Now if that sounds a bit familiar it's likely because the original One Subject, Many Approaches centred on another ruin, the concrete base of a carnival swing ride, from that very same attraction of yore. It is just a quick jaunt, about 300 metres, from this disintegrating nautical structure that is the focus of today's episode, and it wouldn't be at all unusual for me to come away from a little afternoon stroll with images of both. 

Proximity aside however the number of appearances these two subjects have made in my photographic corpus can be attributed to two simple virtues both posses - I find them interesting, and they are convenient. If I only have an hour to kill, if I'm testing new equipment, if there's interesting weather or lighting conditions that could disappear anytime and I need to find a subject now, I know I can get something if I take the five minute drive to old Erie Beach. Still, it's hard to shake the notion that it's really too easy, an almost guilty sense that another trip out to the wall somehow falls short of doing something photographically worthwhile. In spite of this, I often come away with results that surprise me a little. Maybe it's just the low expectations I have for the results.

Here is one from my early days with the RB67, a time when I was still a bit giddy to finally own such a camera. I was smitten with the works of a host of photographers known for their work with long exposures. Lacking a proper neutral density filter at the time I would set up in the fading light of dawn when, if I timed it right, I might be able to make two or three exposures with shutter speeds of one then two then several minutes before they finally became unworkably long.

My first experimental roll putting 35mm film through the RB67, yielding panoramic sprocket hole images. Obviously I wasn't so careful levelling the camera but tilt the film a bit and it almost looks like I meant to do it that way.

An example of the classic leading off to the horizon composition I see as a metaphor for our ceaseless journey into an unknown future that beacons us to a destiny at once fearful and full of promise. Others have suggested images like this are straight up phallic. Hmpf... Freud.

Here's one from this past October that I could have included a few episodes back in The Cool Colours of Autumn. Not a great success but I was just a tad too late to catch just a brief few seconds when the setting sun burst through the clouds casting the wall in a bright warm glow. Even though I had the F80 set to auto focus aperture priority, by the time I realized what was going on and managed to compose this shot it had all but faded. 


There were days this year when water levels in the lake have been unusually high, the changing water levels at times seeming quasi-tidal.  Here a driftwood log serves as foreground interest as the wall, nearly level with the waves, is barely noticeable. There was a workman from the town at the beach that day who, seeing me pull out the camera informed me that I was too late, that there had been a rainbow out over the water that had faded away only minutes before. Looking at that cloud I can't I've lost that much sleep over not having arrived earlier.

Finally here's one from my most recent roll out of the Bronica S2A. Obviously water levels were much lower this time and I decided to chance a stroll along the wall itself. I had been out exploring new locations but with a bit of time yet to kill made a quick side trip on the way home to blow off the last few frames on the roll. Figuring I would travel light that day I left the tripod at home, an unusual choice for me. Regrettable as I could have used it here. With the short days the late afternoon sun was already beginning to fade on an already bleak day and shooting hand held forced a shutter speed/aperture trade off I just couldn't get the better of and I wound up sacrificing foreground sharpness I would have sooner kept. Negotiating the crumbling sections of the wall is a bit tricky to begin with and doing so with a bag containing prized cameras and lenses always feels like a calculated risk, It looks like I may have to do it again though.

Saturday, 5 December 2015

December


Let's play a word game. I say "December" and you think...

Okay, I don't know what you think but no matter where in the world you live or what your background is a pretty good bet would be it involves some sort of holiday celebration. And somehow it's become a widely accepted notion that a winter wonderland theme goes along nicely with holiday festivities. This can even be seen in parts of the world where, not only is snow unheard of in winter, but where the holidays actually mark the start of Summer. But while it's all well and good to spend a December afternoon at an Aussie beach sporting a Santa hat, here in Canada where the whole wintery theme is a bit more realistic there's a sense that the true holiday spirit can't be felt in earnest until there is a covering of snow on the ground. It's been noted time and again that a good pre-Christmas snowfall, something that should be an impediment to shoppers, are accompanies by a spike in holiday sales figures. Like so many others I've been guilty of worrying over whether it will be a white Christmas.

Why "guilty" though? After all, it's such a heart warming image, the world all covered in a frosty virgin white blanket, the multicoloured glow of holiday lights shining through, the neighbour's kids waving as they pass by, toboggans in tow. I say guilty because it's one more way in which the anticipation of something hoped for can make us overlook the blessings of what is right in front of us. Once the riotous colours of autumn begin fading to a dull brown it seems our thoughts skip ahead in anticipation of the (at least where I live) hopefully snowy holiday season to come. Until it arrives it seems so many of us are just biding time, getting shopping done so we can enjoy the season once it starts in earnest. Autumn may be a single season on the calendar but in these temperate climes there is no mistaking its later days from that time of peak foliage colour that gets so much attention. And two thirds of December, after all, consists of late autumn. That may of course have little to do with when the snow actually begins to fly, but depending on when (or even if) it does, much of December sometimes can feel disappointingly just not sufficiently holidayish enough.

It can be a shame because if you take away the omnipresent and not exactly subtle proclamations of the festive holiday season the month is supposed to be building towards and we might begin to notice December's pre-winter, absent the glitter and the lights, has a character and a soul of its own. It's in the skeletal forms of trees, the low hanging sun, the sombre silence of a still day. And then of course there's the autumn clouds you may have heard me go on about before.

If you're a photographer, letting any season pass without exploring its unique character would be like travelling somewhere new and interesting, somewhere you may never be again, and neglecting to get out your camera. But even when you're not carrying a camera, or if you're not a photographer at all, it's worth while, as a simple act of mindfulness, to take in what this time of year offers us in its own right. This is a time of winding down and of renewal. It can be quiet, reflective, maybe even a bit sombre. With so all of the other in-your-face goings on in December why not welcome the reprieve?

Sunday, 22 November 2015

Abstract


When I was posting the above image on my Flickr page the other day I stopped myself short of tagging it with the term "abstract". In practical terms it was a good tag to use, a word a lot of people might search on, drawing more eyeballs to my image. It made me uncomfortable though, so that even after I finally decided to use it I went back and took it out. Heaven forbid I do anything myself that might lend credence to a photograph, one I took no less, being referred to as "an abstract."

 Before you jump to any conclusions though let me hasten to add that that "abstract" is not something I find objectionable or in any way wish not to be associated with my work. Quite the opposite. What bothers me is that when a particular image is deemed to be "abstract", especially "an abstract", the implication is that it possesses some quality that distinguishes it from all those other images that aren't abstract. The problem is there are no such photographs. If I could point to a single realization I've acquired over the years that is most critical to who I am as a photographer today it is the understanding that when I make a photograph, especially one with any sort of expressive intent, abstraction is, without exception, the whole point. That point only gets lost when the term is used to single out only some images from all the rest.

To be clear here I'm not imagining that acquired any special talent that allows me imbue my work with some subtle abstract quality that I'm surprised others don't see. What I'm suggesting applies equally to anyone who has ever made a photograph whether or not they had any notion of this. While this may not be of much interest to those who do photography practical documentary purposed, but even here images are occasionally seem to posses a compelling visual appeal purely by accident. The reason is simple, a camera is a tool of abstraction, that's what it is, that's it's very nature. In short, if it's a photograph, it's abstract.

By this point I am imagining most if not all of you are thinking something along the lines of "But that's ludicrous. I know what abstract art is and that beautiful shot I took of my nephew standing by the window that everybody loves so much is not it!" So if you are thinking something along those lines, given that we're all intelligent, reasonable people here, it's probably safe to assume that I'm not using that word abstract in quite the same way you are. If this were a mere semantic quibble though I'd have done you a disservice allowing you to read as far as you have. The understanding I've come to of that word abstraction though is how I make sense of the fact that the some of the most mundane sights, things you might have passed right by and never even thought to cast a glance towards, perhaps a row of dishes drying on a rack or a clump of trees lying across a soggy field of barley, can become the subjects of photographs we find absolutely captivating. Not incidentally I also find it immensely helpful in the way I understand and approach my own work. When you're trying to make a interesting photographs it can't hurt to have an idea about what it is about photographs that can make them so interesting. If you have a notion to read on then I'll try to make it worth your while.

First, let's talk about the way the word abstract is usually used with reference to art. I think it would be fair to say that whatever the particular usage it is meant to convey a sense of the intangible. We might call the work of a surrealist like Dali abstract because what it depicts defies our sense of how we've come to understand how the world works. Or it could be used with reference to "installation art" such as that pioneered by Marcel Duchamp who used very concrete objects to represent and invite the contemplation of abstract concepts. Perhaps more than anything however it calls to mind non-representational art epitomized by the work of Jackson Pollock whose expressive paint dripped canvases bear no relation or resemblance to anything found outside the world of the psyche. All are abstract, certainly, in obvious though different ways.

The only trouble with this in my view is that when a painting, photograph or any other piece of art is only referred to as abstract when it incorporates some unusual element of abstraction that makes it stand out the message is that when art doesn't have these elements the word abstract doesn't apply. The reason that's not trivial is that it can keep us from appreciating how the element of abstraction is at play throughout all art. As I see it, it is the very essence of art. So how can we ever understand art if we think the word only applies when, for example, a painter is attempting to depict a state of mind without reference to some external "thing"?

Having said that let me take a moment to reel things in a bit. I'm a photographer, this is a photography blog so let's get back to talking about photography more specifically. To me the central mystery of photography and why I even bother with it boils down to the following question:
 How is it that, finding myself before some rather pedestrian scene or object, something I might otherwise have walked right by without a thought, point a camera at it, trip the shutter and end up with something beautiful and engaging enough to want to hang on my wall so I can look at it everyday for years? 
Objectively that thing on the wall is just a pale reflection of whatever it was that I photographed in the first place. To start out with it's been removed from the context of its surroundings to be confined within the rectangular borders of a print. There's no motion, no depth, no hint of the sounds or smells that were present when it was taken. If it's a photograph I made chances are very strong even the colour has been left behind. Given that the thing photographed was often not worth a second glance to begin with this whole endeavour sounds like a profound waste, a good quantity of time material of effort gone to take something that may not have been all that interesting to start and make it even less so.

Except that it isn't. A photograph can be so much more than a poor substitute for the thing photographed, a mere memento. It can become a new thing entirely, not despite the loss of context, dimension or motion but because of them. When we remove these things we make them less specific and therefore more universal. This is how that old pair of shoes in the front foyer you just haven't gotten around to throwing out yet can, when photographed, become all things that have been cast aside and forgotten about. We may not even be aware of the symbolism when we see it, but w well conceived and executed photograph can make you feel it even though those actual shoes in the foyer strike you as a pair of meaningless inanimate objects that would be cause for embarrassment if they were still laying there when company stopped by.

What has happened here is abstraction. That may not seem like it has much to do with the way we usually hear the word abstract use. Commonly understood abstract is sort of the opposite number to that which is real and concrete such that abolishing slavery is a concrete action while freedom is the abstract notion behind it. Fair enough, but it doesn't really help much with our understanding of how a photograph of a thing can possess engaging qualities that even the thing itself lacked. For that I want to go a bit deeper at what that word I keep batting around, "abstract", means more generally. It's comes from the Latin "abstractus" meaning drawn or pulled away. It would have been used mainly to describe some sort of material process such as separating, or drawing away, the wheat from the chaff, the metal from the ore and so on. More simply it means to take a pile of stuff that is a mix of things you want and things you don't, pull away only bits you're after, and leave the rest behind.

Now as a photographer, if you hold it in mind that this is what abstract means you'll see at first that it's a process that's at play in every photograph you've ever made or ever will make. On a foundation like this it now becomes simple to understand how all of the camera's inherent limitations - the way it flattens a three dimensional scene, severing its connection to limitless surroundings to imprison it within a tiny rectangle, all motion arrested, all sounds silenced - these are not limitations at all but the source of its power, the means by which we draw the photographic wheat from the chaotic chaff of the world around us.

I believe any photographer possessing even a modest talent will have some intuitive sense of all this, and even if they go on to great mastery may never put their now highly developed sense into these terms. When we reserve the word abstract denote only work of a more experimental nature the developing photographer (i.e. any photographer not on their death bed) is left to grope in the dark on their own for this understanding. Nor is it enough to save the word to mean "especially abstract" or "abstract in an unusual way". For example, photography has been called an "art of subtraction", where subtraction means something very close to what I mean by abstraction, so why don't I just say subtraction and leave those who want to talk about abstract photography as a special category alone? The answer is that used this way the new word "subtract" in no way fails to apply once we start talking about the things people like to refer to as distinctly "abstract", such as an image in which we have subtracted the cues that normally allow us to clearly identify the subject, thereby introducing one more abstraction.

The problem isn't the choice of terms, it's that we're trying to use terms to draw a distinction between things for which no fundamental distinction exists. Pretending they do only obscures things more, stifling our understanding along the way. The kinds of abstraction we use - the more abstract black and white rather than colour or more abstract still photography rather than motion pictures - are creative choices and asserting that the choice to photograph the more abstract distorted reflection of a subject (thereby creating "an abstract") rather than shooting it straight on is somehow different in kind from all the other choices does nothing but put up additional barriers to understanding.

And if the word abstract makes you a little uneasy because you fancy yourself someone who goes for literal interpretations in photography, remind yourself that, in photography especially, the idea of being fully literal and the idea of interpretation are inevitably at loggerheads. As is true with so many things, in photography abstraction is inevitable. Learn to embrace it, to use it. It will bring you greater understanding and make you a better photographer. And if you're not sure how, imagine yourself standing in front of a print by a one of the great photographers who's name you would never think to associate with the idea of "abstract photography". Let's say it was Ansel Adams, and he was standing there with you so you could ask him how it was made. I don't know what his real answer would have been, but a perfectly true and valid answer could be... "I simply cropped away, desaturated and tonally compressed everything that wasn't Moonrise Hernandez."

See... abstract.